


Powerlifting Hook Grip: Cues, Drills, and Big Pulls
You're standing over a heavy deadlift, palms chalked, bar quiet on the platform, and the last decision belongs to your thumbs. Double overhand has already started to open. Mixed grip would probably hold, but you don't want the asymmetry or the habit of relying on an underhand arm. The hook grip is available, although your thumb pad is already asking whether you've practiced it enough.
That hesitation matters. A powerlifting hook grip isn't a wrist angle or a trick reserved for a personal record. It's a mechanical commitment made before the bar leaves the floor. Done correctly, the fingers trap the thumb so the grip can't unwind as the bar pulls downward. Done poorly, the thumb floats, the wrist folds, and the lift fails before your legs or back get a fair chance.
This guide covers the lock itself, a progression from warm-ups to heavy singles, and accessory work that helps your thumb pad and fingers tolerate serious pulling. It also covers competition rules, because a grip that works in your home gym still has to satisfy the referee.
Standing Over the Bar
The lifter sets his feet, takes one breath, and reaches for the knurling. The bar is loaded heavily enough that the first thought isn't “pull hard.” It's “will my hands stay closed?”
His palms are damp beneath the chalk. He drags each thumb across the bar, presses the webbing into the knurl, and wraps the fingers over the thumb. That last movement decides whether the grip is real. If the thumb sits beside the fingers, the bar can roll. If the fingers close over it, the bar has to force the fingers to uncurl before it can escape.
Practical rule: Commit to the hook before you brace. Don't try to rescue a loose thumb after the bar is already moving.
The setup should feel deliberate, not frantic. Plant the feet, hinge into position, pull the slack from the bar, and let the shoulders settle. Keep the wrists as neutral as the bar path allows. The hook grip belongs in the hands, but the decision begins before your first breath is held.
The decision before the cue
Many lifters wait for a coach to say “lock it in.” That cue arrives too late if the thumb hasn't been placed in the right position. Your first job is to create the contact points. Your second is to build body tension around them.
Use a repeatable sequence:
- Set the feet and bring the shins to the bar without rolling it away.
- Place the thumb first, pushing the thumb pad into the knurling.
- Close the index and middle fingers over the thumb.
- Pull the slack out while keeping the bar close.
- Brace and drive, rather than yanking against a half-formed grip.
The aim isn't to make the thumb comfortable immediately. The aim is to make the hold predictable enough that discomfort doesn't change your technique.
A hook grip often feels worse during a slow setup than during the pull because the bar tension hasn't yet tightened the clamp. That's normal training discomfort. Sharp pain during setup is different. It's a reason to change the session, not a badge of commitment.
The pages ahead deal with three practical problems: how the bar tension creates the lock, how to build exposure without tearing the thumb pad, and how to train the finger and thumb strength that keeps heavy attempts from turning into grip failures.
How the Hook Grip Actually Locks
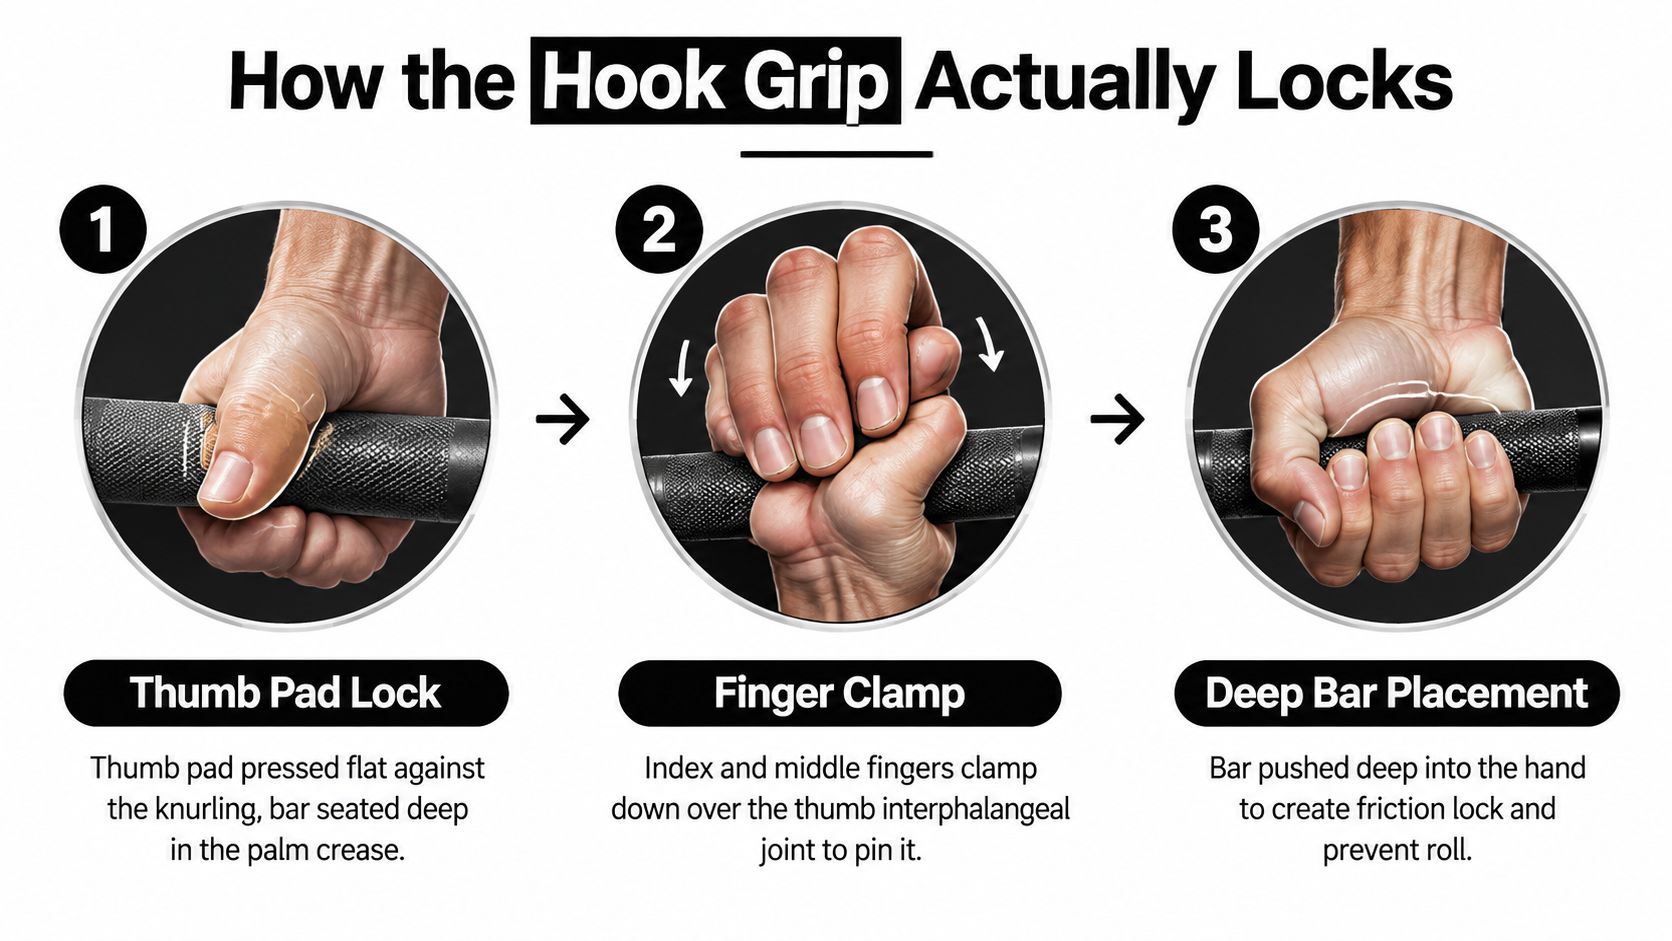
Under a heavy deadlift, the hook grip holds because the bar increases pressure on its own clamp. The thumb pad presses into the bar, the fingers close over the thumb, and the bar sits deep enough in the hand to limit rotation. The biomechanical explanation of deadlift grips describes the thumb-first setup and the self-locking wedge created as the bar pulls downward. That tension mechanism matters more than placing the thumb under the fingers.
Build the lock in three contacts
First, drive the thumb pad into the knurling. Press the webbing between the thumb and index finger firmly against the bar. If the first knurl feels too shallow or the thumb slides toward the fingertips, place the thumb deeper and use the cue, “drive the thumb pad into the second knurl.”
Second, clamp the fingers over the thumb. The index and middle fingers should cover the thumb's last joint area, rather than touching its side. Use “squeeze the index finger like you're crushing a walnut.” The ring and little fingers add pressure, but the first two fingers usually create the main clamp.
Third, seat the bar deep in the hand. Use “pinch the bar to the heel of the hand.” A bar resting only in the fingers has room to roll. A bar set against the palm crease, with the fingers still active, creates more friction and gives the thumb less space to escape.
As the bar tries to rotate out of the palm, the trapped thumb becomes a wedge. The fingers pin it against the bar, while the downward pull increases compression between the thumb and fingers. That is why a hook grip can feel more secure after the bar leaves the floor than during a slow setup.
Adjust the variables, not the concept
Knurling depth changes the pressure required from the thumb. A smooth or worn section demands more accurate placement. Hand width also changes the setup, but grip style and hand width remain separate choices. In a competition deadlift, the 2026 IPF Technical Rulebook permits the hands to sit anywhere inside or in contact with the inner collars.
Bar circumference affects how much of the thumb the fingers can cover. Smaller hands may need a narrower contact position and slower exposure. Larger hands may cover more of the thumb, but they still need the bar seated properly.
Hook grip is primarily a crush grip, not just a support grip. The hand must actively compress the thumb beneath the fingers. If the thumb fails first, weak forearms are only one possibility. Poor thumb-pad pressure, shallow finger coverage, or a bar position that allows rotation can cause the same failure.
The video below shows the hand placement and movement in real time. Watch the thumb-first setup and the bar's position, rather than copying only the finished appearance.
Training Progression From Empty Bar to Max Pull
Hook grip has to become boring before it becomes dependable. The lifter who uses it only on a heavy single is practicing pain and panic, not skill. Build exposure through warm-ups first, then move the grip into the work that resembles meet attempts.
A practical build can run for 8 to 12 weeks before a meet, with hook-grip practice spread across 2 to 3 sessions per week. Use the percentages as starting points, not as permission to ignore the hand. If the thumb develops sharp pain during setup, reduce the load or switch the session to a grip that lets you train without aggravating the joint.
| Phase | Weeks | Intensity Range | Set/Rep Scheme | Notes |
|---|---|---|---|---|
| Foundation | 1-2 | Empty bar through 60% | Warm-up pulls in hook grip, working sets can use mixed grip above 70% | Build exposure and thumb-pad tolerance |
| Expansion | 3-4 | Up to 80% | 3x5 at 70%, then one top single at RPE 8 in hook grip | Keep the hook on every pull below the top work |
| Specific strength | 5-8 | Working-set loads | 4x3 at 75-80%, plus top doubles or triples in hook grip | Remove mixed grip from deadlifts |
| Peak | Meet preparation | Heavy singles | 1x1 at RPE 8-9, then every deadlift single in hook grip | Use the hook grip for opener attempts |
Phase one and two
During the first two weeks, use hook grip from the empty bar through 60%, including the barbell warm-up and lighter positional pulls. If a session includes work above 70%, mixed grip can remain available for the working sets while the hands adapt. That isn't failure. It's controlled exposure.
In weeks three and four, extend hook grip through 80%. The top single at RPE 8 should feel demanding but technically repeatable. If the thumb opens, don't immediately add tape or squeeze harder. Check whether the thumb was placed enough and whether you started the pull with a folded wrist.
Phase three and peaking
Weeks five through eight are where the grip becomes specific. Use hook grip for 4x3 at 75-80%, top doubles, and top triples. Mixed grip comes off deadlifts entirely if your hands can maintain the hold without sharp pain.
During the peaking phase, every deadlift single should use hook grip, including the opener. The opener is supposed to feel familiar. A grip switch on meet day adds a technical variable when your attention should be on commands, bar position, and finishing the lift.
For detailed ways to organize grip exposure alongside your normal pulling work, use this powerlifting grip training resource. Back off when thumb soreness exceeds normal training fatigue, especially if pain changes your setup, remains sharp between sets, or worsens as the session continues.
What the Numbers Say About Hook Grip Performance
The strongest direct evidence in the supplied research comes from a controlled study of 11 well-trained men with at least 3 months of hook-grip experience. In power cleans, hook grip produced a higher power clean 1RM than closed grip, with P<.001 and an effect size of 0.43. The study also found improvements across most submaximal loads in peak velocity, peak power, peak force, and catch height, with effect sizes ranging from 0.40 to 0.96 depending on the measure. Read the controlled power-clean study on PubMed
The useful coaching point isn't that a clean study magically predicts a deadlift max. It's that a secure double-overhand hold can let the athlete express force without changing grips during the pull and turnover. The researchers' practical takeaway supports using hook grip from the start of the pull through the turnover, rather than switching late.
| Metric | Closed grip | Hook grip | Deadlift implication |
|---|---|---|---|
| Power clean 1RM | Lower in the controlled comparison | Higher, P<.001, ES 0.43 | A secure hold can support heavier expression of force |
| Peak velocity | Lower across the comparison | Improved across most submaximal loads, ES 0.41-0.70 | Useful when grip insecurity makes the athlete pull cautiously |
| Peak power | Lower in the comparison | Improved across most submaximal loads, ES 0.43-0.61 | Supports aggressive but controlled acceleration |
| Peak force | Lower in the comparison | Improved across most submaximal loads, ES 0.50-0.57 | A stable hand connection helps transmit force |
| Catch height | Lower in the comparison | Improved across most submaximal loads, ES 0.40-0.96 | Relevant to confidence under fast turnover |
The study didn't test deadlift attempts, mixed grip, or spinal rotation. Those claims shouldn't be smuggled into the data. In practice, hook grip gives a powerlifter a symmetrical hand position and removes the need to place one arm underhand, but the value still depends on the athlete's technique and tolerance.
If two lifters move the same dead weight, the better hook gripper may have more grip reserve left. That reserve can matter late in a session, when a tired athlete has to produce another controlled attempt instead of fighting the bar with already-open fingers.
Accessory Drills That Build a Crush-Proof Hold
The best accessory is the one that strengthens the exact part of the hook grip that fails. Don't turn grip training into a random collection of grippers, wrist curls, and painful holds. The thumb needs pressure tolerance, the fingers need clamp strength, and the forearm needs to keep working without making the next deadlift session worse.
Rank the work by transfer
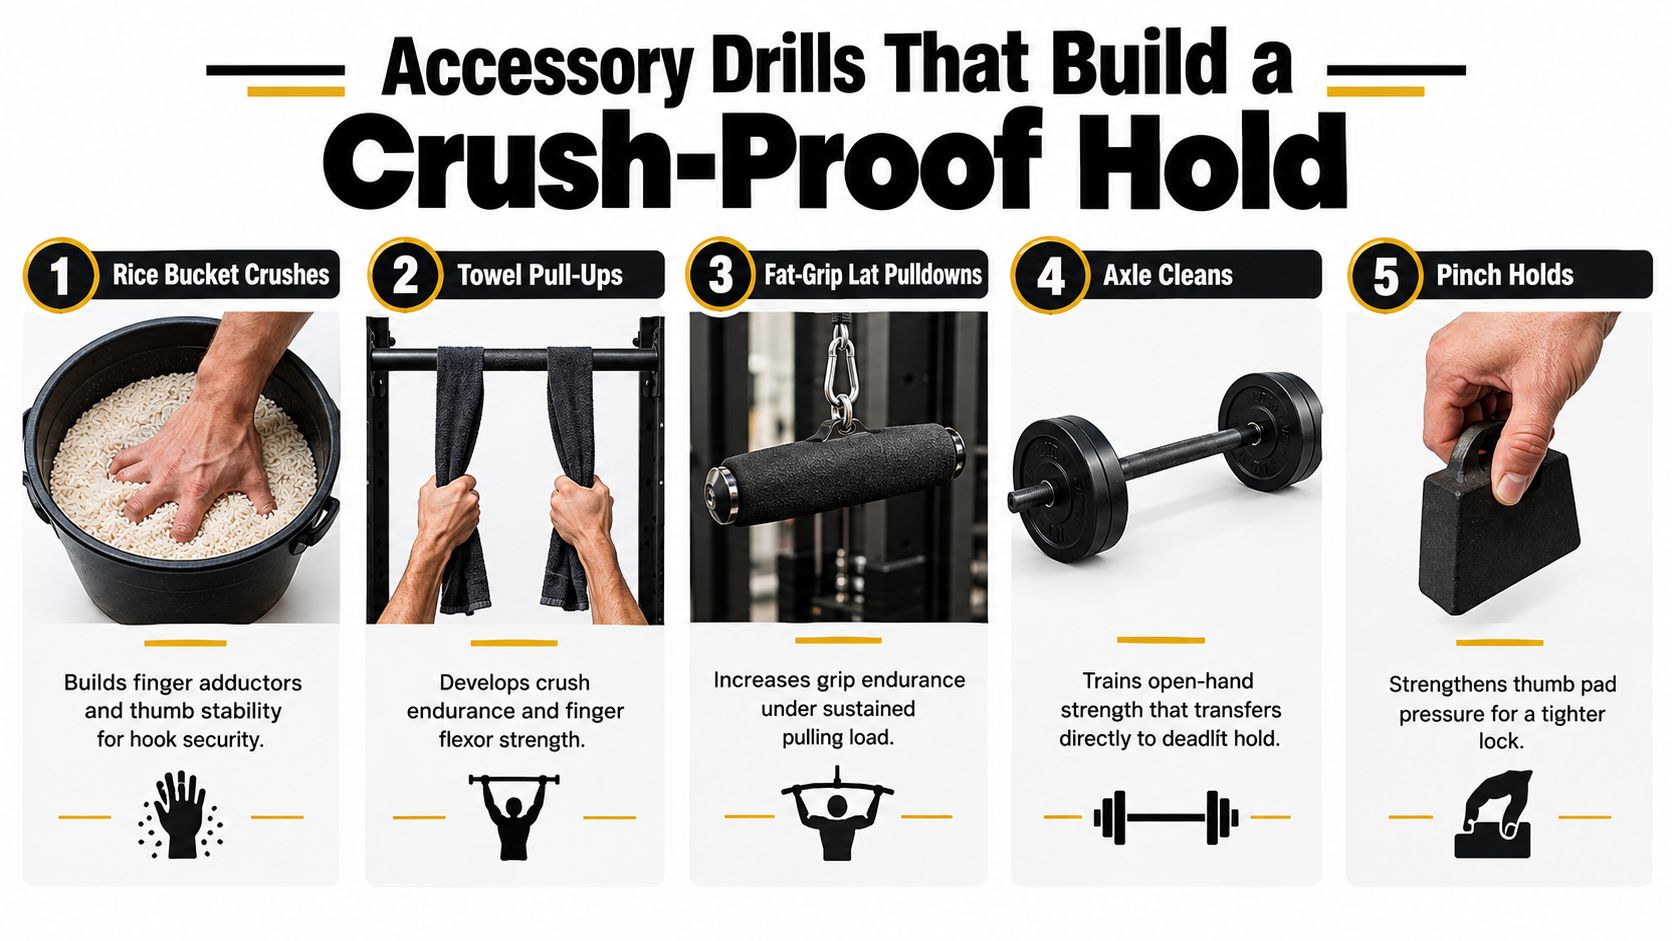
- Rice bucket crushes belong in the warm-up. Open and close the hand through the rice, rotate the wrist, and finish with deliberate thumb presses. Use a few controlled rounds before upper-body or deadlift work. The purpose is hand temperature and finger adduction, not exhaustion.
- Towel pull-ups train a different kind of demand. Grip a towel over a pull-up bar and perform controlled repetitions or short isometric holds. If pull-ups are too fatiguing, use towel rows. Place this work after the main lift or on an upper-body day so it doesn't blunt the deadlift.
- Fat-grip lat pulldowns build sustained crush endurance. Add a thick handle to pulldowns and keep the wrist neutral. Use moderate loading for controlled sets, stopping before the fingers lose position. The grip should work, but the lats should still receive the intended training.
- Axle cleans or fat-grip deadlifts expose weak hand positions. Keep the load around 60-70% for time under tension, and use these as a finisher rather than a max-strength test. A thick bar reduces the available finger closure, so the exercise can overload the hand quickly.
- Dead hangs with hook grip teach tolerance. Use a pull-up bar, set the thumb under the fingers, and hold only while the thumb position remains clean. Short holds after pulling are enough. This is tendon-conditioning practice, not a contest to see how long you can tolerate pain.
Between sessions, use a tennis ball for gentle thumb-pad pressure and an emery board to smooth rough callus edges. Don't file the pad aggressively. A torn callus is not useful toughness, it's an interruption to training.
Programming warning: Don't stack all five drills on the same day. Stagger them so the thumb gets practice without arriving at deadlifts already irritated.
A simple three-day integration
- Deadlift day: Rice bucket work in the warm-up, then hook-grip deadlifts. Add axle work only as a restrained finisher.
- Upper-body day: Towel pull-ups or rows between selected sets, followed by light thumb-pad maintenance.
- Second pulling day: Fat-grip pulldowns, then short hook-grip dead hangs if the thumb feels normal.
The deadlift grip-strength guide can help you place these drills around your existing training. When the thumb pad starts tearing, deload thumb volume immediately. Keep the main lift productive and remove the accessory that caused the skin problem.
Common Mistakes and the Injuries They Cause
Hook grip doesn't automatically tear the thumbs. Poor exposure, bad placement, and stubbornness do more damage than the technique itself. The grip also isn't reserved only for maximal attempts. It should be practiced light enough that the athlete can learn the position before heavy loading turns every error into a missed lift.
The errors that keep showing up
The thumb floats on top of the fingers. That's not a hook. It's a loose overhand grip with extra pressure on the thumb. The fix is simple: thumb first, then index and middle fingers over the thumb joint. Use paused setup drills where you hold the start position before pulling.
The wrist folds at setup. Excessive wrist flexion shortens the hand's ability to clamp and can make the bar roll toward the fingers. Set the wrist as neutral as possible, pull the slack out, and use slow-tempo deadlifts to catch the collapse before the bar gains speed.
Tape reduces contact. Tape can protect the skin, but if it's wrapped so thickly that the thumb pad can't press into the bar, it undermines the lock. Test any tape strategy with light warm-ups and check your federation's rules before competition.
The lifter death-grips before the bar moves. Maximal squeezing from the first second can burn the forearms before the hardest part of the pull. Keep the fingers closed, but let the bar tension finish tightening the wedge. The cue is “secure, then brace,” not “crush until the setup shakes.”
Mixed grip appears whenever the bar gets heavy. This feels clever because it solves the immediate problem. It also prevents the specific hook strength from developing. Keep mixed grip as a backup for a painful session, not as the automatic answer whenever the load becomes challenging.
The injury patterns coaches need to watch include index-finger adductor strain, distal thumb-joint irritation or sprain, medial elbow tendinopathy from excessive gripping volume, and a missed lockout when the fingers open before the lift is complete. None of those outcomes makes hook grip mandatory.
Sharp thumb pain during setup is the signal to change the session. Normal pressure after repeated exposure is different from a sharp joint sensation.
If the thumb hurts sharply before the pull, use a less demanding grip for that session and review placement, tape, bar diameter, and recent accessory volume. Straps can still have a place in noncompetitive training, particularly when the goal is to load the posterior chain without making grip the limiter. They don't replace competition-specific practice.
Meet Day Rules and a Four Week Checklist
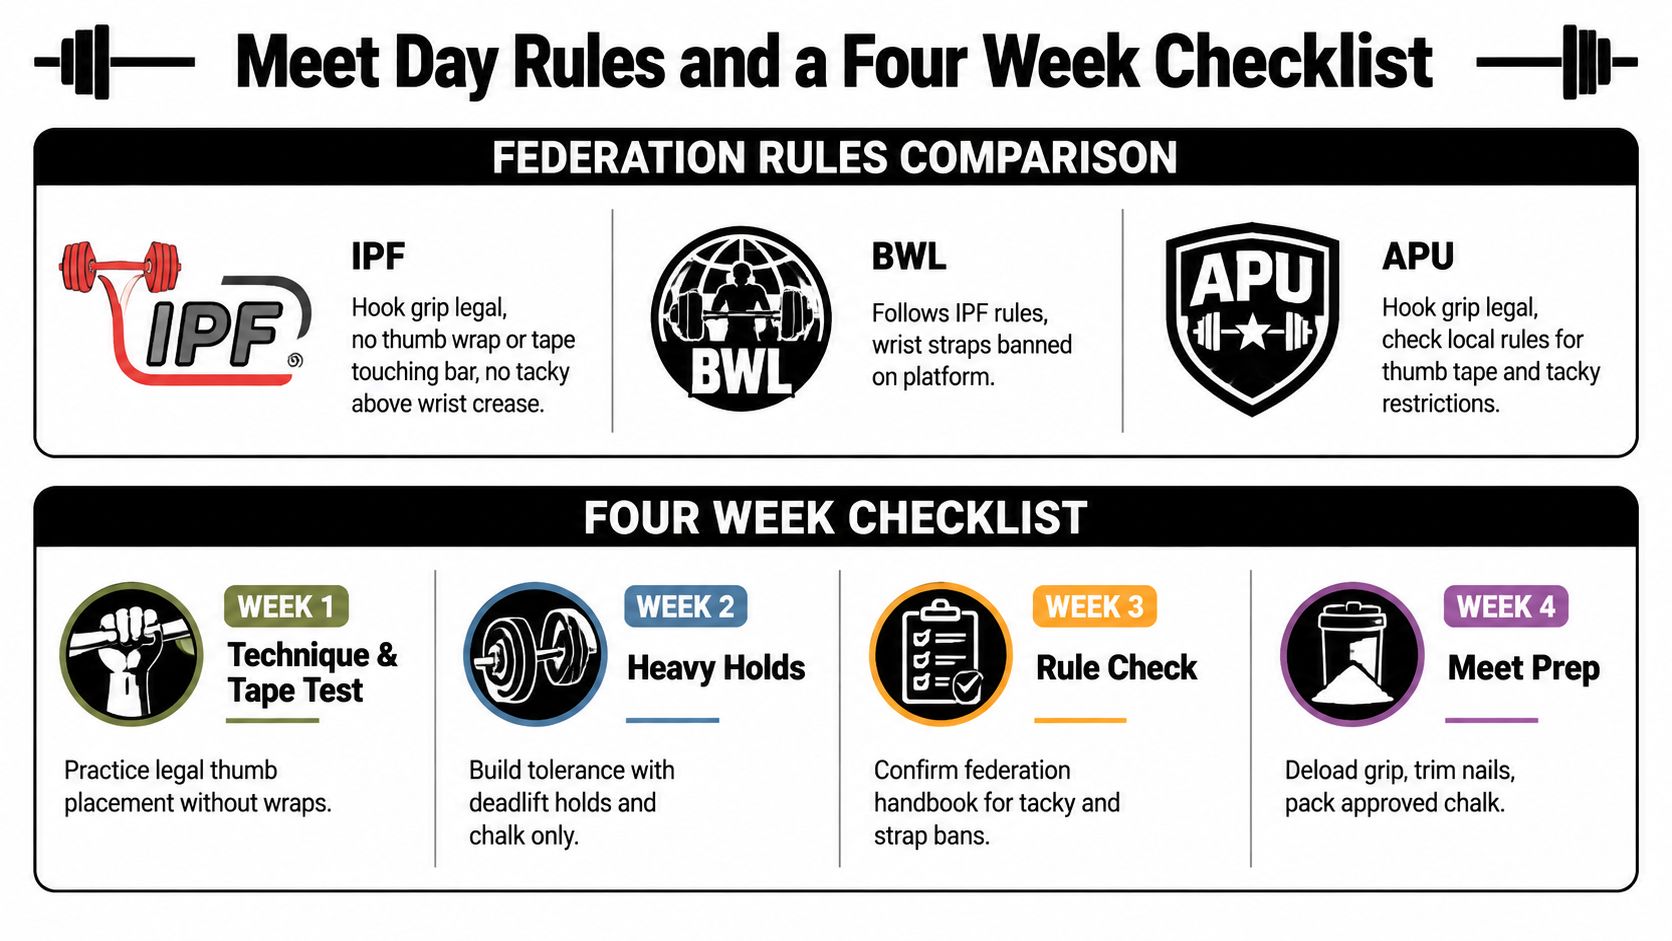
Meet rules reward a controlled pull, not a clever workaround. As noted earlier, IPF deadlift standards require the hands, thumbs, and fingers to stay in contact with the bar throughout the lift, while allowing the thumbs to remain unwrapped. A hook grip therefore remains legal when contact is continuous. Hand placement may sit anywhere inside or against the inner collars. Check the current rule wording before entering a sanctioned meet, rather than relying on gym advice.
British Weightlifting's 2025 technical competition rules explicitly permit the hook grip and describe it as covering the last joint of the thumb with the other fingers of that hand. The bar must also be lowered in front of the body after the referee's signal, and released only after it passes below shoulder level. Read the British Weightlifting rule wording and train the grip without neglecting the full competition standard.
The American Powerlifting Union permits hook grip for the deadlift, with the bar required to rise in one continuous motion. Hitching or jerking it up the thighs remains illegal, and deliberately releasing the bar above the knees may count as equipment abuse. Review the APU rulebook section on deadlift bar movement and hitching for the federation hosting your meet.
Four weeks of final preparation
- Week one, technique and tape test: Use hook grip for every warm-up at 50%. Rehearse legal thumb placement without wraps, then add rice-bucket thumb work twice daily if your skin and joints tolerate it.
- Week two, heavy holds: Perform 70% doubles and add three-second top lockouts. Chalk your hands, then keep the thumb position unchanged from setup through lockout.
- Week three, rule check: Add 85% singles and dedicated thumb IP extensions after training. Confirm the federation's current handbook for tape, tacky, chalk, and strap restrictions.
- Week four, meet preparation: Simulate opener and second-attempt loads, then reduce grip fatigue before platform time. Keep mixed grip as a meet-day backup only when the federation permits it and hook grip becomes unsafe.
On meet morning, check the thumb-tape policy before warming up. Use only permitted chalk on clean, dry hands, and rehearse the hook at a calm tempo. Start with the empty bar, add weight gradually, and leave pain-tolerance tests out of the warm-up room.
For low-mess hand preparation in training, learn about liquid chalk for powerlifting. Evermost LLC offers EVMT Liquid Chalk in portable and larger bottles for weightlifting and other grip-intensive work. Apply it as a grip aid, let it dry, and follow the competition's equipment policy.
If grip uncertainty is costing heavy attempts, visit Evermost LLC for a liquid-chalk option suited to training, home-gym sessions, or grip-intensive barbell work. Use it alongside consistent hook-grip practice, not instead of building the thumb and finger strength that keeps the bar connected.