


Olympic Weightlifting Grip: Technique, Widths, and Fixes
A heavy clean rarely fails because the lifter suddenly forgets how to pull. More often, the problem starts earlier, when the hand contacts the bar without enough security to connect the pull to the catch. The most popular advice, “just grip harder,” misses the point. Olympic weightlifting grip is a technical position, not a test of how aggressively you can squeeze.
The hook grip is permitted by the International Weightlifting Federation's technical rules, and serious lifters use it because the thumb lock helps keep the bar attached during explosive movement. But grip choice still depends on the lift, the phase, the width, the athlete's hand position, and the condition of the skin. The right setup gives your legs, hips, and back a clearer path to express force.
The Grip Mistake That Costs You Heavy Lifts
The lifter is preparing for a third-attempt clean. The bar sits against the shins, the back angle looks disciplined, and the first pull rises smoothly. At the knee, nothing looks wrong. Then the bar accelerates past the thigh, rotates toward the fingertips, and rolls away at the hip. The lifter pulls under, but the connection has already disappeared. The bar lands forward, the elbows arrive late, and the attempt is lost before the catch can save it.
That miss gets blamed on hip contact, timing, or a weak turnover. Sometimes those are the issues. But the hand is the hinge between the pull and the catch, and a loose or poorly chosen grip can interrupt every good position above it.
Lifters often spend sessions studying bar path, knee clearance, torso angle, and hip contact while treating hand placement as automatic. It isn't. The bar must remain secure through acceleration, transition, and turnover, then release only at the legal point in the lift sequence. The IWF rules specifically state that the grip must only be released after the bar has passed the level of the body below the waist, which makes hand security a competition requirement, not a minor preference. Read the IWF rule language on hooking and grip release before you treat grip as an accessory detail.
The hand controls force transfer
A weak connection creates several practical problems:
- Force leaks: Your lower body can produce power, but the bar won't receive it efficiently if the hand shifts.
- Timing changes: Re-gripping during the second pull can alter the bar's rotation and delay the turnover.
- Fatigue rises: The fingers and forearms work harder when the thumb isn't helping lock the bar.
- Confidence drops: A lifter who expects the bar to slip often pulls cautiously, especially from the floor.
The hook grip addresses the first part of the problem by wrapping the thumb around the bar and locking the fingers over it. It doesn't replace sound pulling mechanics, and it won't correct a bar that travels around the knees or a torso that collapses. It does give the lift a more dependable connection from setup to turnover.
The method has been present in weightlifting culture for decades. IronMind's interview-based history records Olympic champion Tommy Kono saying he was already using the hook grip in 1948, placing the technique firmly in the postwar era of modern Olympic lifting. Its long history and formal rule status explain why the hook grip is now a foundational skill for serious snatches and cleans.
Platform cue: Before you chase a stronger pull, ask whether the bar is actually locked to your hand through the point where you need to change direction.
Olympic Weightlifting Grips Explained
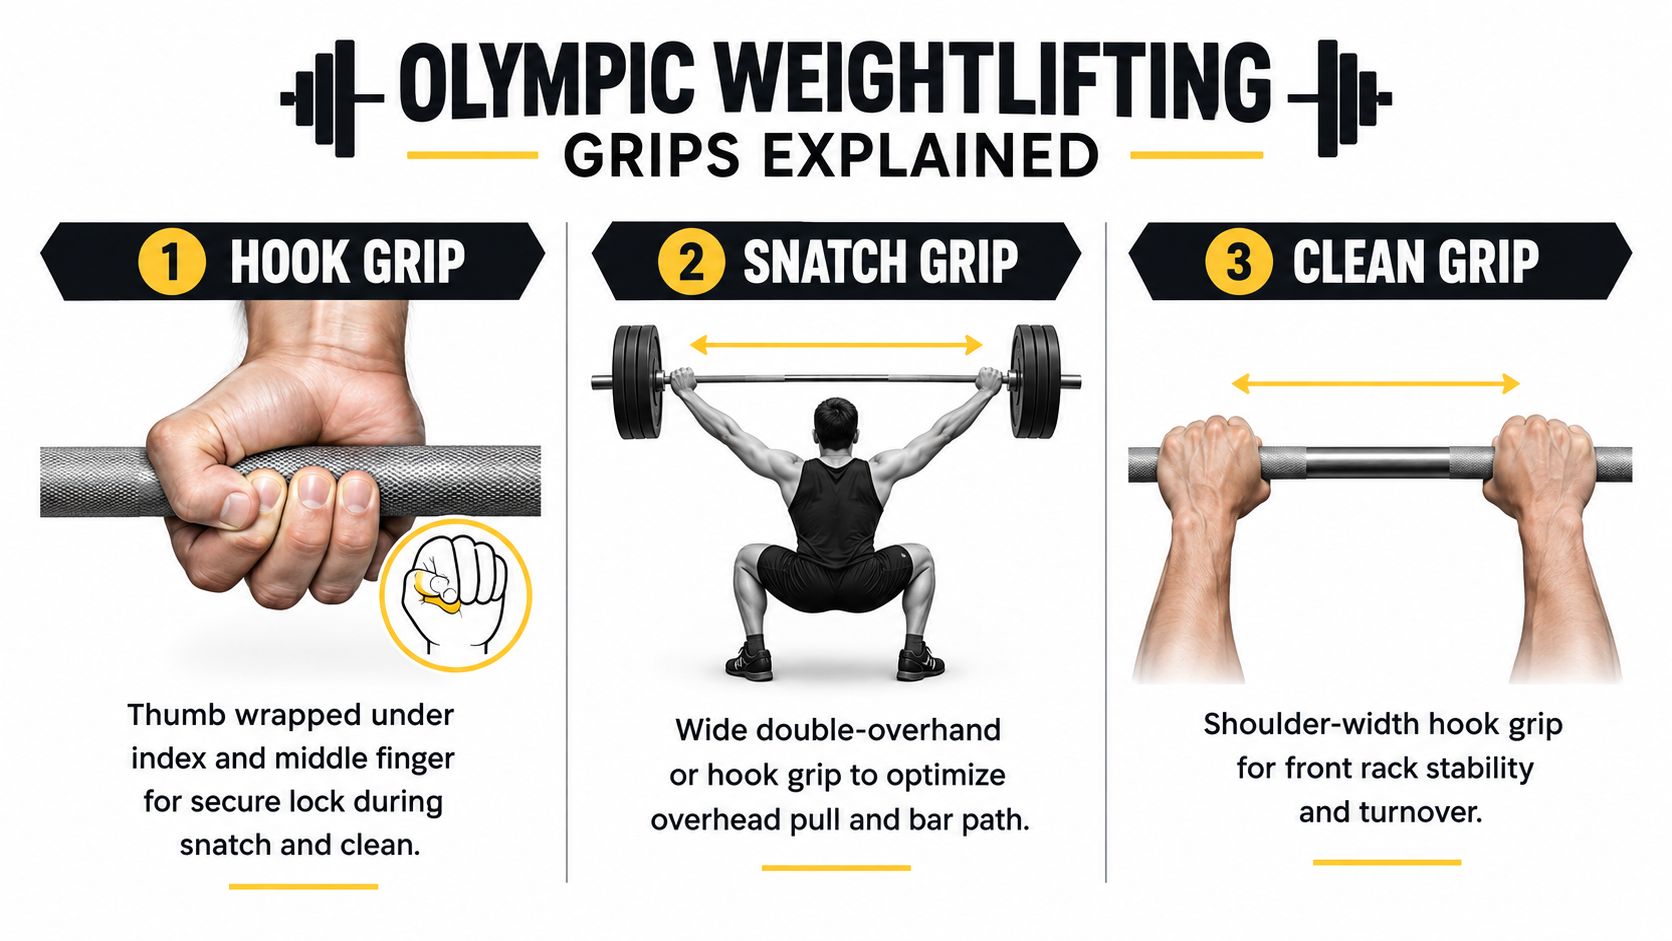
Grip names can create confusion because some describe the thumb position, while others describe the width or the lift. Start by separating those ideas. A hook grip describes how the thumb is secured. A snatch grip and clean grip describe where the hands sit on the bar.
The hook grip wraps the thumb around the bar, then places the index and middle fingers over the thumb to create a lock. The hand remains overhand, not supinated. This is the standard legal grip for the snatch and clean, and the IWF rules and regulations explicitly permit the technique known as hooking.
Match the grip to the movement
Snatch grip: Place the hands wide enough for the bar to reach the hip crease or pubic-bone area when you stand tall. Use a wide hook grip or a wide double-overhand grip during early teaching drills. The hook becomes increasingly important as the bar gets heavier or the pull becomes faster.
Clean grip: Use a narrower double-overhand or hook grip, with the hands just outside the crease of the hips. The position needs to let the bar rake the thighs and then rotate into a stable front rack without forcing the wrists forward.
Mixed grip: Turn one palm up and keep the other palm down. This can help in accessory pulling work, but it isn't the normal choice for competition snatches or cleans because it changes the shoulder and arm relationship on the bar.
False or open grip: Keep the thumb outside the fingers. Coaches may use it for technique drills, teaching the second pull, or supporting the bar during a jerk. It offers less security for a heavy pull, so it shouldn't replace the hook grip in demanding snatch and clean attempts.
A simple weekly rule works well. Use the hook grip for your snatches, cleans, and their heavy derivatives. Use an open grip when the drill is specifically teaching relaxed hands, turnover, or jerk support. Reserve the mixed grip for accessory pulling blocks where the lift isn't being judged as an Olympic competition movement. For more detail on setup variations, use this weightlifting grip guide.
Finding the Right Grip Width
Grip width should be chosen from body landmarks, not copied from another lifter. Your hands need to place the bar where the lift can happen cleanly. A fixed distance may work for one athlete and force another into a poor start position.
For the snatch, stand tall with the bar in your hands and adjust until it rests near the pubic bone while your shoulders stay relaxed. The wrists should remain stacked rather than bent sharply, and the forearms should point naturally toward the bar. Many lifters land somewhere around one and a half to two times shoulder width, but the landmark check matters more than the estimate.
The clean uses a narrower position. Set the hands just outside the crease of the hips, then check whether the bar can stay close as it passes the knees and thighs. At full extension, the bar should be able to rake the thighs without pulling you forward. During the catch, the grip must allow the elbows to rotate through without making the front rack feel forced.
Use a camera, not a guess
Film the setup from the front and inspect three things:
- Wrist alignment: The wrists should look straight rather than folded backward or sharply sideways.
- Forearm relationship: The forearms should create a clean line into the bar instead of angling dramatically.
- Bar location: The bar should sit over the appropriate body landmark without forcing the shoulders to shrug or the torso to fold.
Too narrow, and the bar can drift toward the knees, creating a longer route around the legs. Too wide, and the torso may collapse or the second pull may lose room to develop. Make small changes, such as one to two centimeters between sessions, then test the new position through hang work, pulls, and full lifts. Large changes make it difficult to tell whether the width solved the problem or created another one.
Your grip width may also change slightly with a different bar, shoe, stance, or body position. Treat the marks on the knurling as reference points, not as a substitute for checking the bar against your body.
Hook Grip Technique Step by Step
The hook grip should feel secure before the bar leaves the floor. If you only try to create the lock after the pull begins, you're asking the fingers to solve a setup error while the bar is already accelerating.
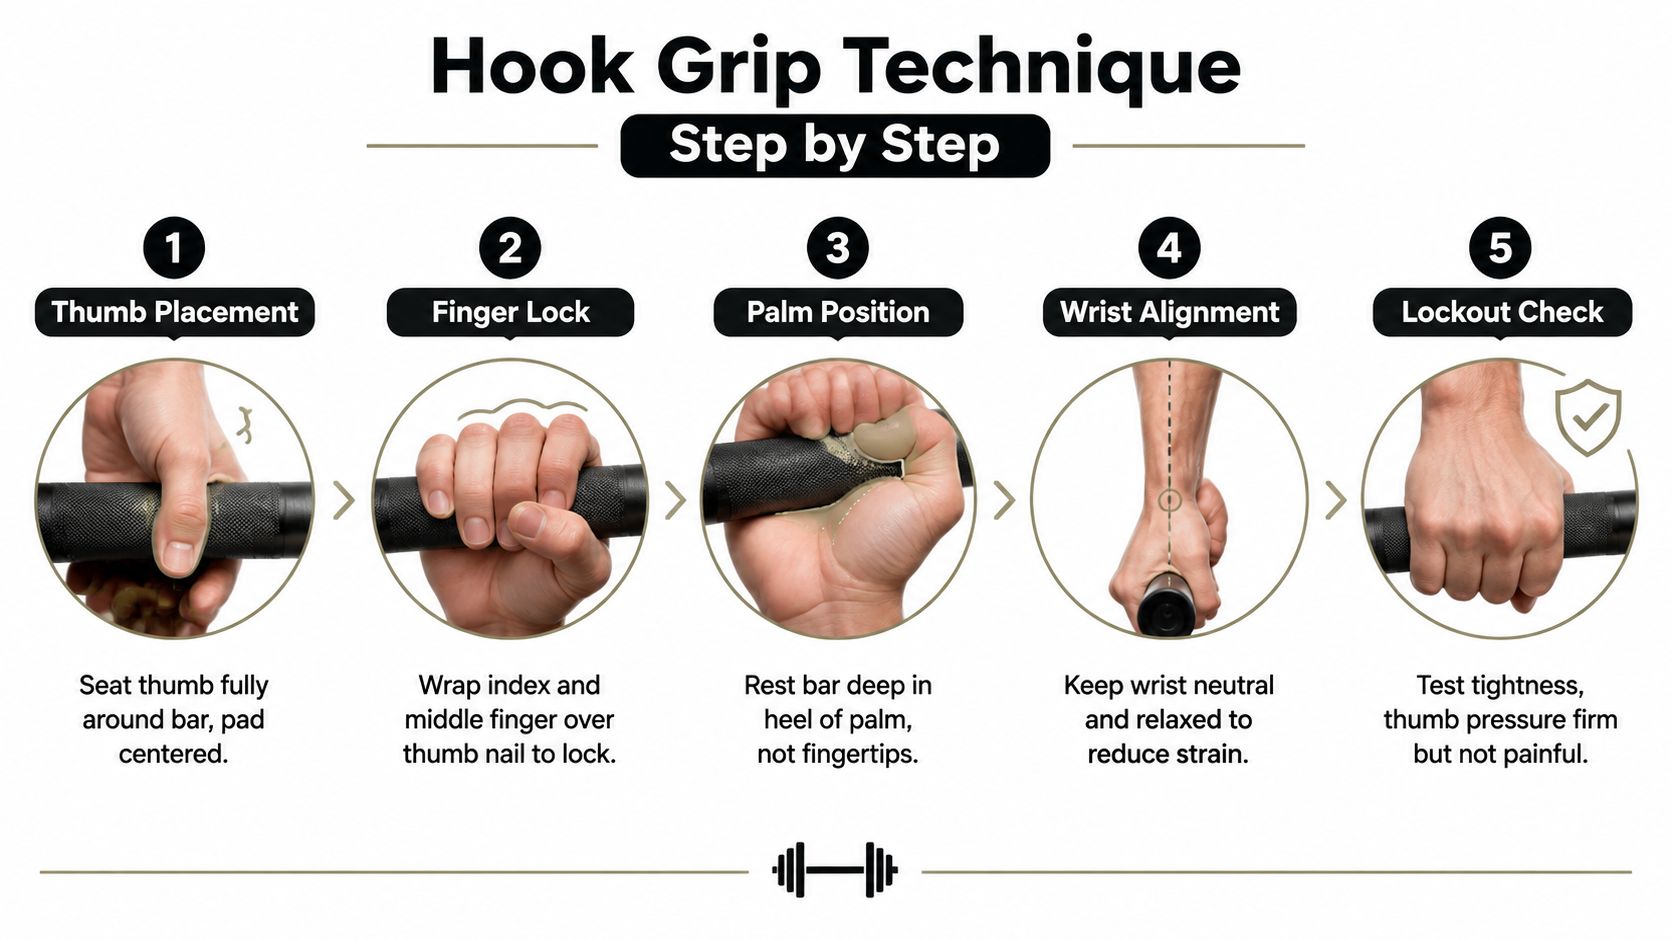
Start by placing the thumb around the bar. Seat it fully beneath the index and middle fingers, with the thumb pad making broad contact rather than catching the bar with its tip. Next, close the fingers over the thumb. The index finger often creates the first lock, while the middle finger adds the pressure that keeps the thumb from sliding.
Build the hand position from the palm outward
Keep the bar deep in the heel of the palm, not perched across the fingertips. A deep position gives the wrist and forearm a cleaner load path. Then stack the wrist so it isn't excessively bent, and let the forearm support the hand without trying to crush the bar with maximum effort.
The grip should tighten as the bar accelerates. At the start, maintain enough pressure to keep the lock stable while avoiding unnecessary forearm tension. During the pull, the fingers close more firmly around the thumb as the bar gains speed. You shouldn't need to re-grip in the middle of a snatch or clean.
For the clean setup, take a moment to reset the thumb before each serious repetition. Roll the bar into the hand, wrap the thumb, and confirm that the index and middle fingers are over it. In touch-and-go work, preserve the hand position rather than allowing the bar to fall into the fingertips at the bottom.
Solve thumb discomfort without abandoning the skill
Thumb pain is common during the learning phase, but sharp pain, swelling, numbness, or symptoms that persist should be assessed by a qualified clinician. For ordinary skin and pressure discomfort, use a thin layer of athletic tape around the thumb knuckle, keep calluses smooth, and introduce the position gradually with doubles and triples before using it for demanding work.
Thumb rule: The grip should feel uncomfortable while you adapt, but it shouldn't feel damaged. Pain that changes your pull is a reason to reduce load or return to a closed grip temporarily.
Commit to the hook grip when the bar is heavy, the lift includes a fast turnover, and your setup is repeatable. Revert to a closed grip for a drill when the goal is relaxed-hand technique, or when thumb irritation prevents you from training safely. The decision should preserve quality, not prove toughness.
What the Data Says About Hook Grip Performance
The hook grip isn't supported only by tradition. Experimental work on the power clean found that lifters using it increased 1RM by 6.6%, raised peak barbell velocity by 2.9% to 5.2%, and improved relative peak power by 5.7% to 15.1% across submaximal loads. The study also found no substantial horizontal bar-path differences, which suggests the advantage wasn't a different route for the bar. See the published power clean comparison for the measured outcomes.
A separate controlled comparison reported a higher power-clean 1RM with the hook grip by about 6.8 kilograms, along with higher peak velocity, power, force, and catch height at most submaximal loads. That evidence is summarized in the PubMed record for the grip comparison. The practical interpretation is more precise than “hook grip makes you stronger.” It may help you express power more effectively, especially during turnover and catch timing.
Later findings support that distinction. Catch and total clean durations were shorter at 80% to 95% of 1RM with the hook grip, while normalized force-time and bar-path variables during the pull didn't show meaningful differences between grips. The grip may improve the outcome by keeping the hand secure and helping the athlete complete the transition, rather than by creating a different first or second pull.
| Metric | Hook Grip | Closed Grip |
|---|---|---|
| Bar security during explosive pulls | Thumb lock supports a secure connection | Depends more heavily on finger and forearm control |
| Power-clean 1RM | Higher by 6.6% in one study | Lower in that comparison |
| Peak velocity | Increased by 2.9% to 5.2% in the cited study | Lower in that comparison |
| Turnover timing | Shorter catch and total durations at 80% to 95% of 1RM | Longer in that comparison |
| Setup and tolerance | More demanding on the thumb while adapting | Usually more comfortable initially |
| Best use | Snatches, cleans, heavy derivatives, and competition lifts | Technique drills or selected accessory work |
The research doesn't justify promising the same result for every athlete or every derivative. It does support using the hook grip when the lift includes a catch and the bar must remain connected through rapid turnover. For high-repetition accessory pulls, manage thumb tolerance and skin condition rather than forcing the grip beyond what the session requires.
Mobility and Strength Drills for a Stronger Grip
Hook-grip strength is partly hand strength, but it's also tolerance, wrist control, thumb mobility, and the ability to stay relaxed while maintaining a lock. A lifter who squeezes maximally from the first warm-up may create forearm fatigue before the important sets begin.
Begin with thumb-isometric squeezes against a smooth dowel. Wrap the thumb around the dowel, place the fingers over it, and apply firm pressure without bending the wrist. Hold the position briefly, release, and repeat with attention to the thumb pad rather than the fingertip. This teaches the specific thumb-and-finger relationship without immediately loading a barbell.
Progress the stress gradually
Move from isometrics to hook-grip farmer carries with a manageable load. Keep the shoulders level and the wrists neutral. Timed dead hangs can follow, but use the hook position only if the bar and body position remain controlled. The purpose is to build support tolerance, not to turn every session into a test of pain.
Barbell drills should reinforce the Olympic positions:
- Clean pulls: Use the clean hook grip and keep the bar close through the knee and thigh.
- Snatch-grip rows: Keep the wrists organized and avoid letting the bar roll toward the fingertips.
- Foam-axle rotations: Rotate the forearm around a thick, padded implement to challenge wrist control.
- Wrist circles: Move slowly through comfortable ranges before loading the hands.
- Thumb opposition stretches: Bring the thumb gently across the palm without forcing the joint.
The suggested clean-pull load of 90% and the progression toward a 5RM snatch pull over six weeks belong in a structured program, not in a first exposure. Start with empty-bar hook holds, then add carries and hangs, followed by light pulls. Train this micro-progression three days per week, but reduce the work if the thumb or forearm remains irritated between sessions.
For a broader menu of carries, hangs, and hand-specific work, use this grip strength training resource. The priority is repeatable positions. A lighter hold performed with a clean wrist and stable thumb teaches more than a maximal effort that leaves the hand sore.
Troubleshooting Blisters, Slipping, and Forearm Pain
A blister doesn't automatically mean the hook grip is wrong, and slipping doesn't automatically mean your hands are weak. Diagnose where the problem occurs and what the bar is doing before changing the entire technique.
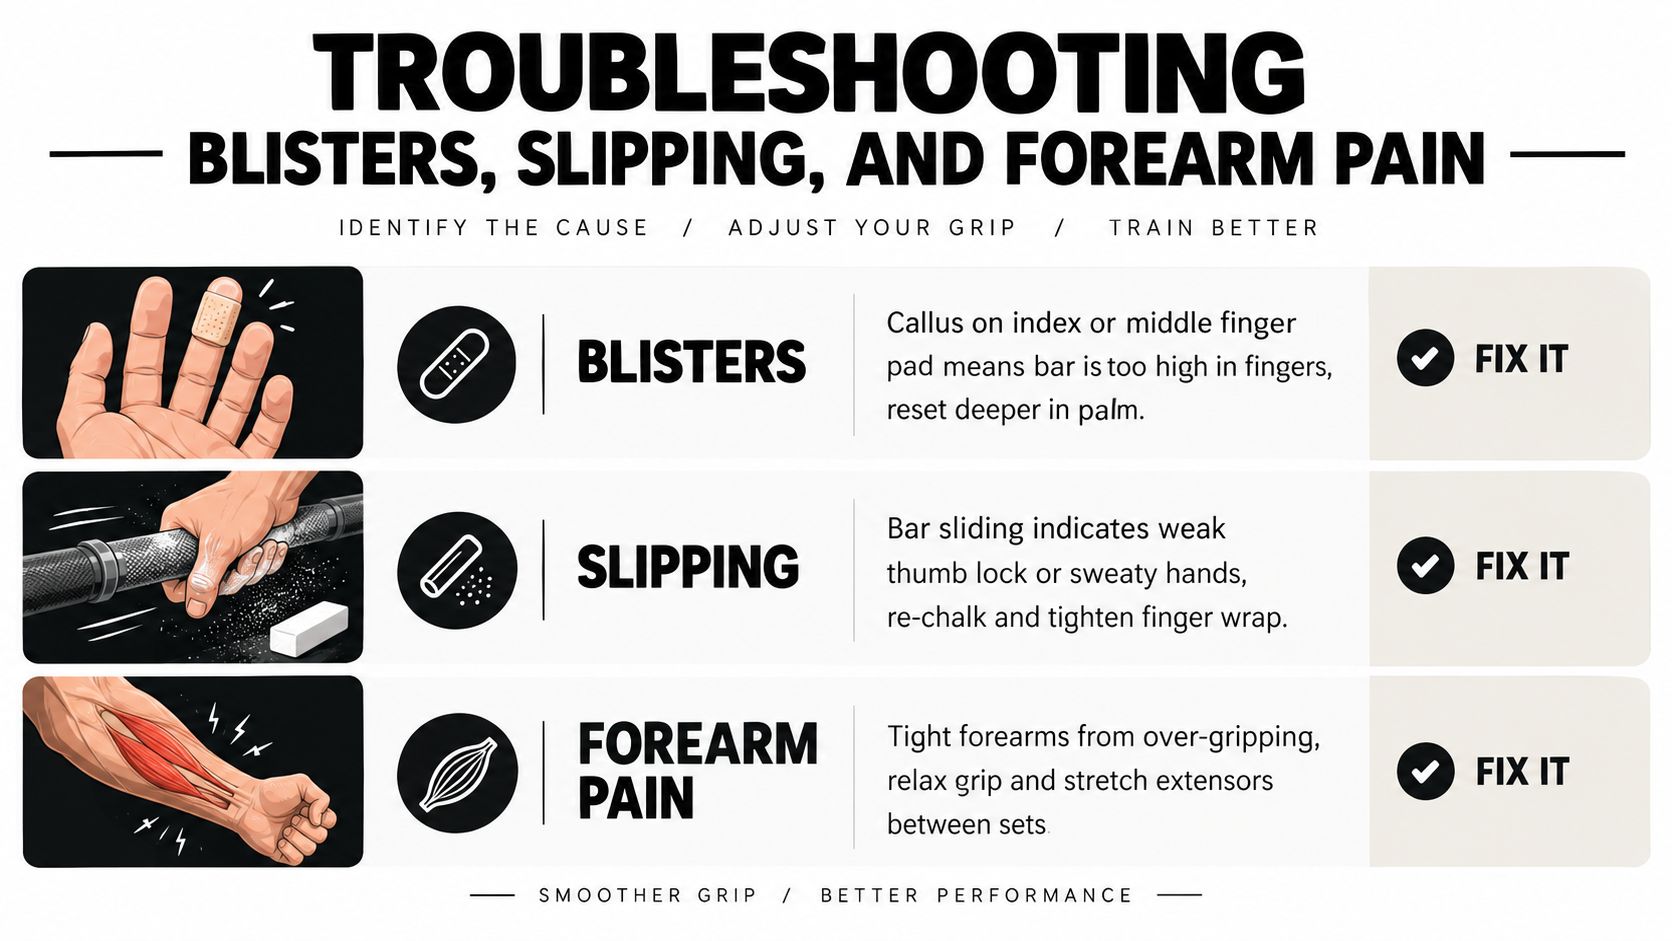
A blister or thick callus on the index or middle finger pad often points to re-gripping during the pull. The bar is moving inside the hand instead of staying anchored. Reset the bar deeper in the palm, smooth the callus with a leather pumice, and use a callus shaver at 48-hour intervals when needed. During heavy sessions, a thin athletic-tape ring over a hot spot can reduce friction without covering the whole hand.
A blister on the thumb pad may indicate an overly aggressive wrap or a thumb position that catches the bar with too much pressure in one small area. Seat the thumb fully, spread contact across the pad, and build exposure through controlled repetitions. Tape can protect the skin, but it won't correct a thumb that is being crushed against the knurling.
Separate moisture from technique
If the bar slides, check sweat management first. Apply chalk immediately before the lift rather than during the warm-up, inspect whether the bar's knurling is clean and usable, and confirm that the fingers are locked over the thumb. In the clean, use a deliberate re-grip cue during setup, not halfway through the second pull.
The IWF's current rules recognize magnesium carbonate chalk as a permitted competition aid. That matters because chalk helps address moisture without changing the legal hand position.
Forearm pain needs more caution. General flexor irritation may respond to eccentric wrist curls with a dowel, neutral-grip farmer carries, and gentle thumb mobility. Numbness, tingling, weakness, or pain that feels like nerve compression isn't a problem to solve by gripping harder. Stop the aggravating movement and seek qualified assessment.
Return check: Resume demanding lifts only when you can make the hook without sharp pain, hold the bar through the pull, keep both wrists organized, and complete warm-up repetitions without compensating.
Competition Rules and Grip Aids That Actually Work
Competition grip preparation should follow the rules, not gym folklore. The IWF permits chalk, and its regulations identify it as magnesium carbonate while requiring chalk and rosin to be available near the platform. Official Olympic guidance also notes that athletes commonly use chalk to dry the hands, and the rules allow tape on areas such as the wrists and thumbs. Check the Olympic weightlifting rules overview alongside the current IWF regulations before competing.
The hook grip remains the practical standard for competition snatches and cleans because it keeps both hands pronated and supports a consistent turnover. A mixed grip may be legal for some pulling activities, but it isn't usually the optimal choice for the contested lifts. Gloves and tacky substances don't belong on the competition platform, and straps are training tools rather than competition aids.
Liquid chalk and loose chalk solve related problems in different ways. Loose chalk is quick to reapply and familiar in most weight rooms, but it can create dust and spread across equipment. Liquid chalk forms a thin coating that dries in 10 to 15 seconds, according to the product guidance supplied for this topic, and it can remain useful longer between applications. Reapply based on sweat, bar feel, and the demands of the session rather than following a rigid timer.
| Grip Aid | Competition (IWF) | Training | Notes |
|---|---|---|---|
| Magnesium carbonate chalk | Permitted | Permitted | Use it to manage moisture and improve contact |
| Wrist wraps | Allowed within IWF equipment rules | Useful for demanding lifts | Check placement and any event-specific restrictions |
| Finger or thumb tape | Tape is allowed on permitted body areas | Useful for skin protection | Tape shouldn't replace a sound hook position |
| Gloves | Prohibited on the platform | Optional in general training | They change hand contact and aren't suited to competition lifting |
| Tacky substances | Prohibited | Avoid for Olympic barbell practice | They can alter the bar's normal feel and rotation |
| Lifting straps | Not permitted in competition | Useful for selected pulls and rows | Don't use them when practicing a competition lift you must secure unaided |
For application details, see this guide to using weightlifting chalk. EVMT Liquid Chalk is one clean, gym-approved option from Evermost LLC, formulated to dry quickly and provide a sweat-resistant barrier for grip-intensive training, including Olympic lifting. It can fit home gyms and commercial facilities where loose chalk creates unwanted residue, but always follow the competition venue's own equipment inspection process.
Before stepping onto the platform, run the same short checklist:
- Chalk applied: Your hands are dry, but not coated so heavily that the bar feel changes.
- Tape inspected: Thumb or finger tape is secure, thin, and free from loose edges.
- Wraps checked: Wrist wraps meet the event's requirements and are ready for official inspection.
- Hook tested: Warm-up lifts confirm that the thumb lock feels stable at the working width.
- Backup planned: If the second pull breaks down, you know whether the adjustment is grip width, load selection, or a return to a simpler technical cue.
Build a more dependable bar connection by practicing your Olympic weightlifting grip in warm-ups, recording your setup, and solving skin or moisture problems before they reach heavy attempts. For clean, fast-drying grip support suited to serious training, visit Evermost LLC and choose the EVMT Liquid Chalk format that fits your platform work or home gym.