


Knee Bar Rock Climbing: A Practical Technique Guide
A knee bar works by wedging the lower thigh into a hold while driving the foot in the opposite direction, creating opposition that unloads the arms for a static rest. Since 50% to 82% of rock climbers sustain at least one climbing-related injury each year, efficient positioning matters, especially when fatigue makes every grip less reliable (NIH-indexed review).
The move often appears when a climber is hanging beneath a steep roof, forearms swelling, hands slipping on damp holds, and ordinary footwork no longer buys enough time. A good knee bar changes the problem. Instead of asking the fingers to hold everything, the climber uses leg length, wall geometry, and body tension to create a temporary support point. The right chalk routine helps too, particularly on long routes where sweaty hands make repeated re-chalking disruptive.
Table of Contents
- The Discovery of the Knee Bar
- Mastering Body Positioning for Knee Bars
- The Importance of the Shindex
- Indoor vs Outdoor Knee Bar Contexts
- Training Progressions and Safety Tips
- Conclusion - Embracing the Knee Bar
The Discovery of the Knee Bar
A climber reaches a steep roof, locks off on tired arms, and searches for the next handhold. The feet keep cutting loose. A heel hook feels too weak, a toe hook points the body in the wrong direction, and the route seems to demand another hard pull. Then the knee finds a shallow feature, the foot presses against an opposing hold, and the arms suddenly get room to recover.
That moment can feel like a hidden trick, but the knee bar has deep roots in modern climbing. Its use became especially visible with the rise of steep sport climbing and overhanging routes in the 1970s and 1980s. In Yosemite, climbers improvised with basketball kneepads to protect their knees while squeezing through chimneys and offwidths. By the late 1980s, purpose-built grippy rubber knee and elbow pads were already in use, supporting more deliberate knee protection and pressure.
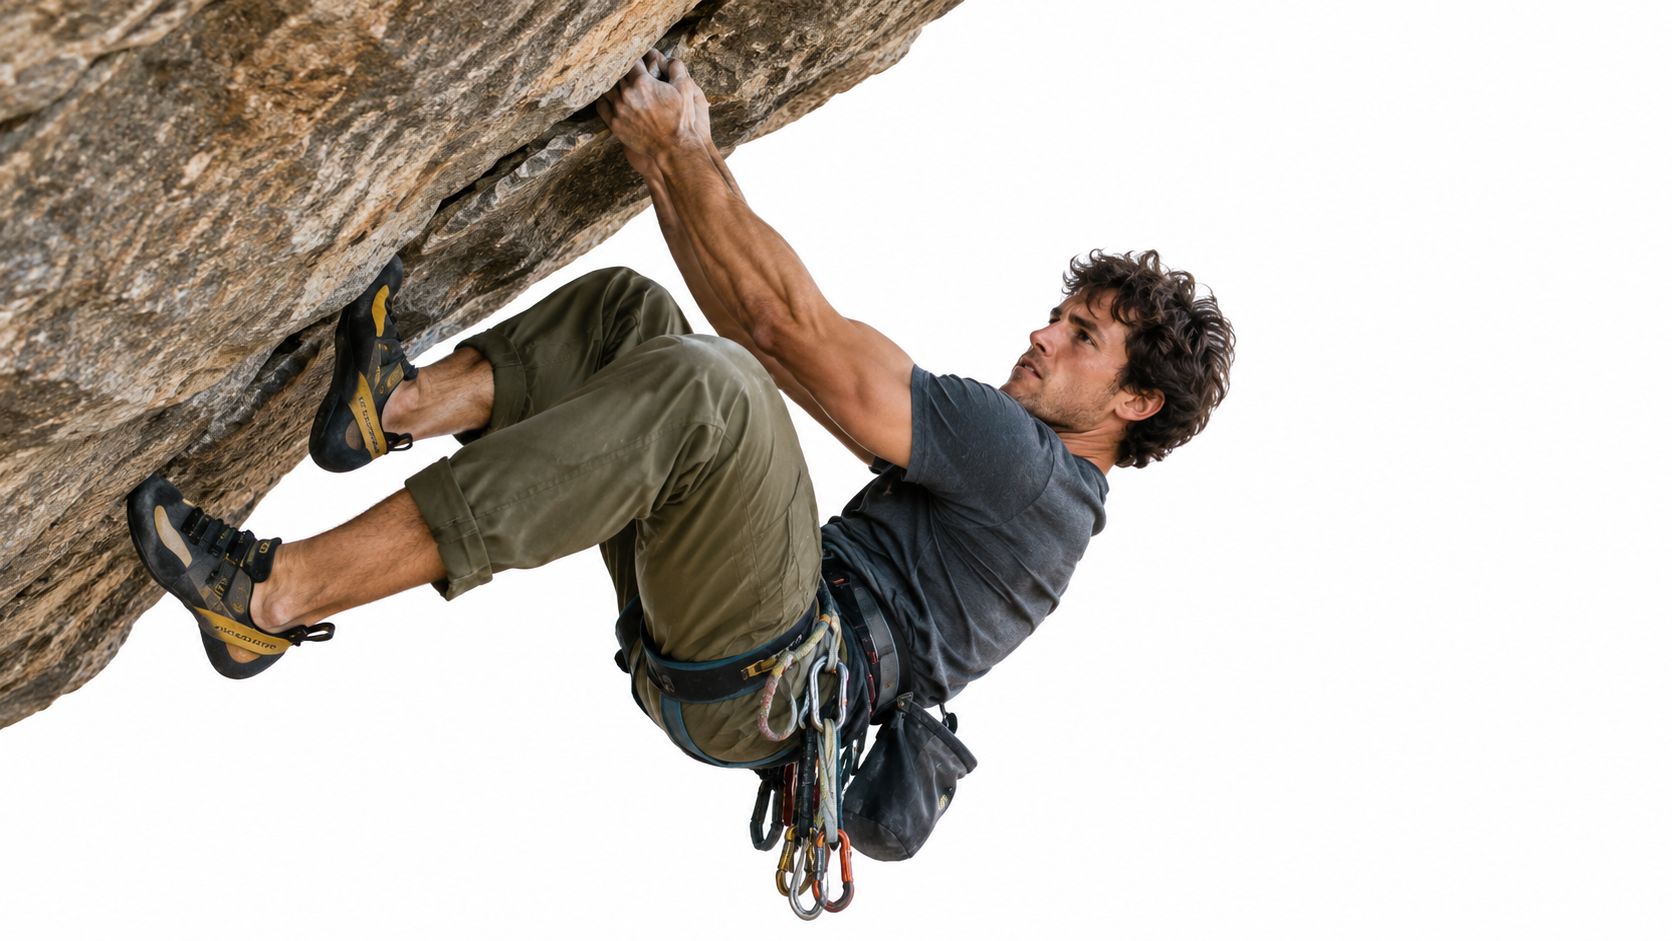
As hard sport routes spread across blocky stone at places such as Jailhouse Rock and Rifle, climbers increasingly used kneebars for rests and technical movement. The technique became particularly valuable on terrain where roofs, tufas, overlaps, and corners offered enough opposing surfaces to cam the leg. A history of climbing knee pads and kneebar use shows how protective equipment and route style developed together.
From protection to performance
The knee bar eventually moved beyond just protecting skin and joints. It became a way to pause, shake one arm, reset the grip, and continue with less accumulated fatigue. On favorable terrain, a climber may even hang with both hands released while maintaining tension through the leg and foot.
A later example appeared on the British route Hubble 9a. Route historians report that a kneebar on the crux was discovered around 2014 and first successfully used on an ascent in 2020. The beta may have made the move slightly easier without clearly changing the overall grade, which illustrates an important point: a small change in body position can materially alter how an elite sequence feels without rewriting the route itself.
The knee bar is now a standard tool for steep climbing, not an emergency trick reserved for unusually flexible climbers. Its value is greatest when the route gives the leg something substantial to press against and the climber can keep the hands relaxed enough to recover.
Mastering Body Positioning for Knee Bars
A knee bar depends on opposition, not just on pushing the knee into a hole. The foot drives one way while the lower thigh presses the other way. That opposing force turns the leg into a static support and shifts some of the load away from the fingers and forearms.
Build the position from the foot
Start by finding a foothold that lines up with the feature intended to receive the thigh. The hold doesn't need to be large, but it must let the foot push with control. A foothold that's too far away creates a stretched, weak position, while one that's too small may force the climber to rely on friction that disappears as soon as sweat builds.
Use this sequence:
- Align the leg. Place the foot so the knee target and foothold sit on a workable line rather than twisting the hip into the wall.
- Insert the thigh. Slide the meaty lower thigh or area just above the knee into the roof, pocket, crack, or rounded feature. The pressure should sit on the thigh, not directly on the kneecap.
- Adjust the leg length. Pointing the heel can lengthen the line through the leg. Dropping the heel can shorten it and sometimes improves the fit.
- Create opposition. Drive pressure through the big toe and calf while pressing the thigh into the opposing surface.
- Engage the body. Tighten the calf, quadriceps, glutes, and core before transferring weight gradually into the position.
- Test the rest. Shift weight slowly, then release one hand. If the hips swing or the foot skates, return to the wall and rebuild the setup.
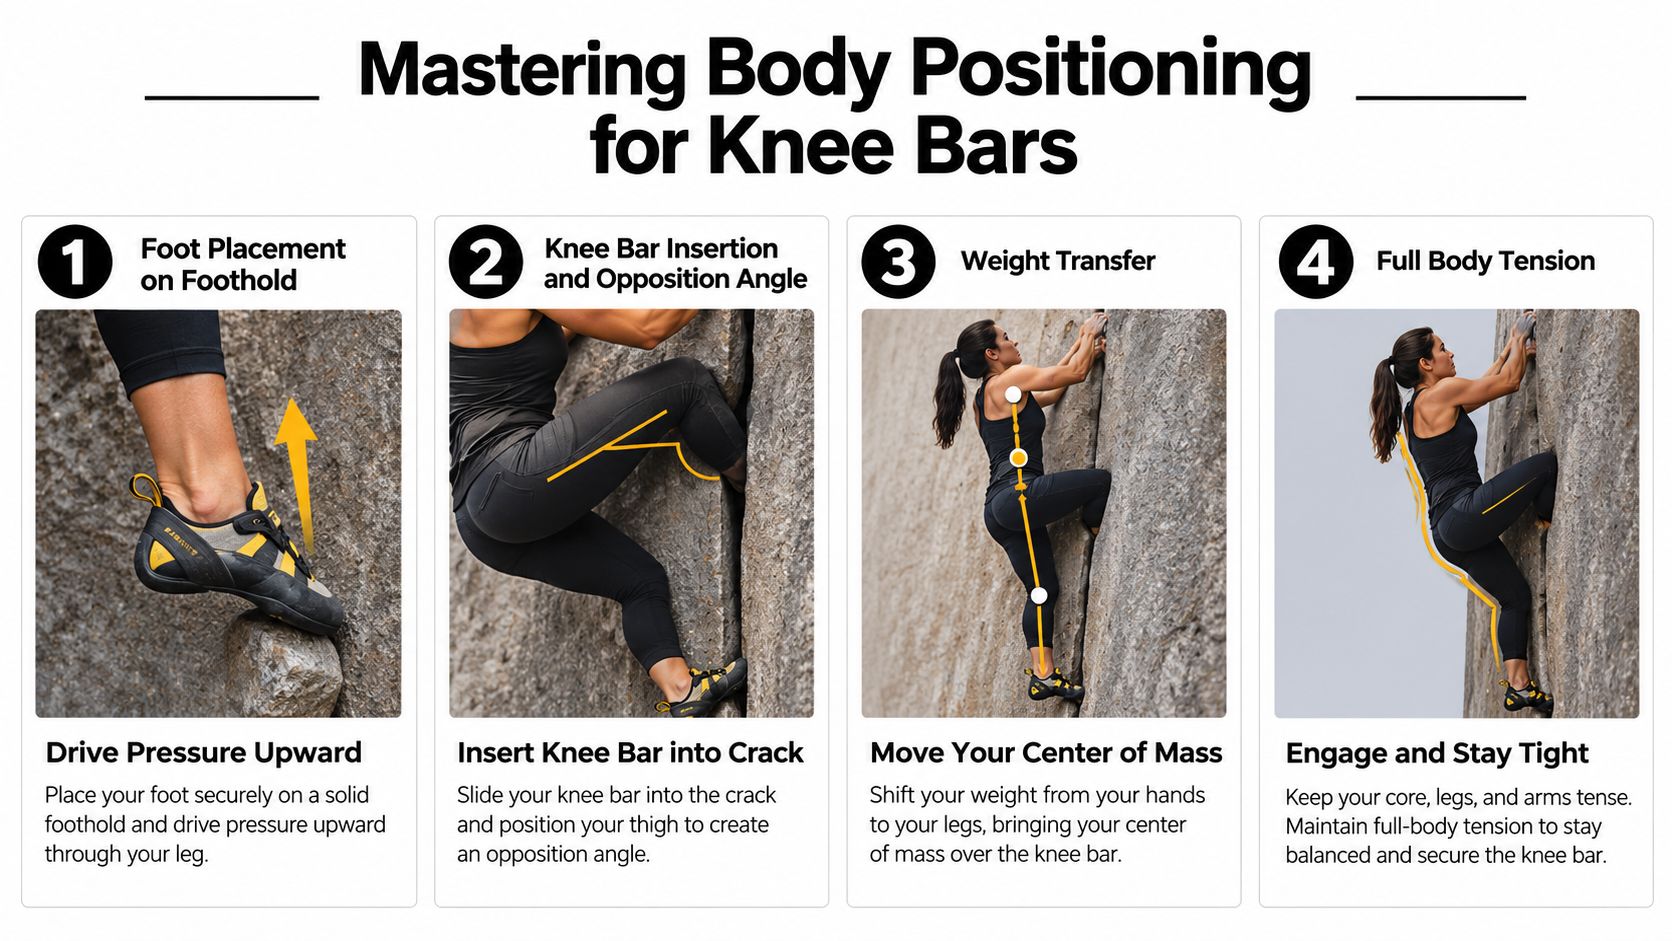
On an overhang, a tripod of contact points usually keeps the position stable. The thigh and foot create the main opposition, while a second foot, hand, or controlled hip position prevents the climber from cutting loose. The technical breakdown of knee bar positioning emphasizes this lower-thigh loading and the need for core tension.
Practical rule: If the pressure feels sharp on the kneecap, the position is wrong. Move the contact higher onto the thigh or change the angle before adding force.
Hip mobility can limit the entry even when the hold geometry looks ideal. Climbers who spend long periods sitting may benefit from general guidance on how to relieve hip tightness, especially if restricted hip motion prevents the knee from reaching the feature without twisting. Mobility work shouldn't be used to force a painful position, though.
A climber should also consider hand friction before entering a long rest. Applying EVMT Liquid Chalk to dry hands, allowing it to dry fully, and then adding powder chalk as normal gives climbers a liquid base layer without asking them to abandon their usual powder routine. The approach is most useful on long sport routes, multi-pitch climbing, or humid gyms, where fewer trips to the chalk bag can make the sequence easier to manage.
For related movement, the drop-knee climbing guide can help climbers distinguish a knee bar from a drop knee. A drop knee rotates the hip and changes body direction, while a knee bar uses opposing pressure to create a rest.
The Importance of the Shindex
The decisive variable in many knee bars isn't brute strength. It's whether the climber's leg matches the available geometry. The term Shindex describes the distance from the big toe to the top of the knee, and it provides a useful way to think about why one climber finds a rest effortlessly while another can't make the same feature work.
A route offers a gap, roof edge, tufa, or corner at a fixed distance. The climber brings a fixed limb length, at least until the heel angle, hip position, and knee bend change the effective reach. If the Shindex matches the gap, the foot can press into one surface while the lower thigh settles into another. If it doesn't, the climber may be left with a bent knee that never generates enough opposition or a foot that has to reach too far to maintain pressure.
Fit comes before force
A useful assessment starts on an easy route or a training wall. Look for a feature where the foot and thigh can contact opposing surfaces without forcing the knee into a painful angle. Notice whether the leg feels securely wedged when the hips stay close to the wall. Then test whether the climber can reduce hand pressure without the foot slipping or the body rotating away.
The same route may offer a perfect knee bar for one climber and no usable rest for another. That isn't a failure of effort. It reflects differences in leg length, hip position, flexibility, and the shape of the hold. Climbers should read the available geometry rather than copying another person's exact beta.
Limited knee flexion is another constraint. Many kneebars require full or near-full knee bend, so restricted mobility can remove access to rests that look obvious from the ground. The guide to knee bar fit and the Shindex frames the move as a relationship between body dimensions and route geometry, not as a test of how hard someone can squeeze.
Read the exit as part of the fit
A knee bar that goes in easily may be difficult to remove. The leg can become so securely cammed that the climber loses the tension needed to release it. Before committing to the rest, identify the next handhold and the direction the hips must travel. Keep the foot engaged while easing the thigh out, rather than pulling the knee free first and allowing the body to swing.
The best position is therefore not always the tightest one. It is the one that provides enough support to recover while preserving a controlled path into the next move.
Indoor vs Outdoor Knee Bar Contexts
Indoor walls make knee bars easy to spot because route setters often place them on steep roofs, compression features, and tufa-style volumes. The surface is predictable, the landing area is managed, and a climber can usually repeat the same entry without dealing with loose rock or uncertain protection. That makes indoor terrain useful for learning how pressure should feel.
Outdoor climbing demands more judgment. A roof edge may be sharp, a corner may flare unexpectedly, and the feature that appears to accept the thigh may not hold body weight in the direction needed. On a long route, the knee bar may be less about completing a single powerful move and more about preserving enough arm capacity to continue climbing after the rest.
Pads change contact, not geometry
Kneepads can reduce bruising and make repeated practice more comfortable. They may also improve friction when the rubber matches the rock or indoor surface. But a pad adds material between the leg and the feature, so it can change the fit, reduce precision, or make a previously clean insertion feel bulky.
Indoor climbers often benefit from a thinner pad when volumes and wall features require precise placement. Outdoor climbers may prefer more coverage when rough rock or repeated kneebars create discomfort. Neither choice guarantees a better rest. Pad thickness, rubber texture, route angle, and the climber's own leg length all affect whether the equipment helps.
A practical discussion of kneepads and knee bar performance notes an important gap in mainstream advice. Climbers commonly hear that pads improve comfort and prevent bruising, but there isn't a universal rule showing when a particular pad will improve success, mobility, or fall safety.
Sweat still matters on steep terrain
A slippery hand can ruin the entry into an otherwise sound knee bar. Climbers shouldn't coat wet hands and expect chalk to solve the problem. Dry the hands first, apply a thin layer of liquid chalk if appropriate, let it dry completely, and add powder chalk over it as usual. The liquid layer acts as a base, while the powder remains available for familiar mid-route touch-ups.
That layering approach is more useful on long sport routes, multi-pitch climbing, and humid indoor walls than on short boulder problems, where the climber may complete the sequence before sweat becomes the limiting factor. It also keeps the focus on grip without asking climbers to replace the chalk system they already trust.
For climbers deciding how different disciplines change the demands of steep movement, bouldering versus top roping offers useful context. The knee bar itself doesn't change, but the consequences of a missed entry and the opportunity to reset can differ substantially.
Training Progressions and Safety Tips
A knee bar often fails before the climber leaves the ground. The foot is placed too far away, the thigh contacts a poor section of the feature, and the first attempt becomes a fight for balance. Practice on a low, stable inside corner or a forgiving roof with a clear landing. Focus first on the opposing pressure between foot and thigh, keeping the hips quiet instead of chasing a hands-free rest.
Build the skill in layers
A useful progression is:
- Find a repeatable position. Enter from a stable stance and check that the thigh, foot, and hips line up without forcing the knee. The distance from big toe to the top of the knee, or your Shindex, helps determine whether the geometry will match. A longer Shindex may bridge a wide gap, while a shorter one may require a closer foothold or different body angle.
- Increase the angle gradually. Move from comfortable corners to steeper terrain only when you can maintain opposition without sharp pressure at the knee. Steeper walls increase the demand on hip tension and make a poor match harder to correct.
- Add the rest. Release one hand, shake it briefly, and replace it before testing the other. Keep enough tension to prevent the hips from sagging as weight shifts from the hands to the leg.
- Practice the exit. Keep the foot loaded, reach toward the next hold, and unwind the thigh slowly. A controlled release keeps the body close to the wall. A rushed release commonly creates a swing.
- Use realistic route settings. Apply the position on roofs, overlaps, and compression sequences once the movement is repeatable. The knee bar should solve a reach, preserve body tension, or create a pause, rather than appear as a forced rest on every steep problem.
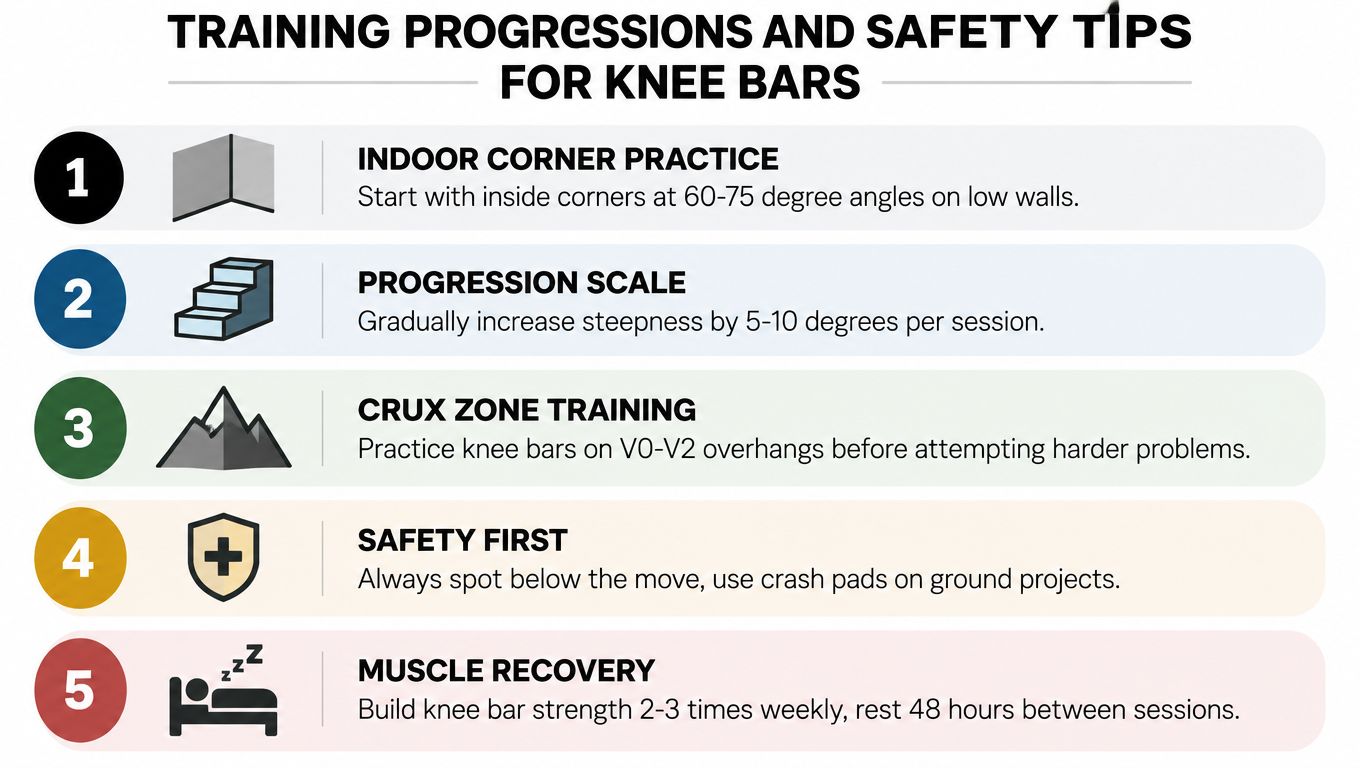
Practice above the ground with suitable landing protection and a spotter when appropriate, particularly on overhangs where a failed release can send you away from the wall. Inspect outdoor features before loading them. Avoid driving the knee into a sharp edge, unstable pocket, or contact point that concentrates pressure on the joint. A pad can protect skin, but it cannot correct mismatched geometry.
The safest knee bar is one the climber can enter, hold, and leave without a sudden loss of tension.
Knee bars can reduce arm fatigue and improve control on steep terrain, yet they do not remove knee, hip, or lower-back strain. Persistent pain deserves assessment rather than repeated attempts to force the same beta. Guidance on knee physical therapy explains how rehabilitation professionals assess knee function, although online information cannot replace an individual examination.
Use knee bars as one option within broader climbing practice. The strength training for climbing guide provides related context for building capacity, while the movement itself depends on accurate foot placement, a Shindex that matches the feature, and patient exits. Stop the drill when pressure becomes sharp or your position becomes uncontrolled. Repeating clean attempts teaches more than forcing one successful lock-off.
Conclusion - Embracing the Knee Bar
A knee bar is a geometry skill disguised as a strength move. The climber wedges the lower thigh into a feature, drives the foot in the opposite direction, and uses core tension to create a stable rest. The most successful positions match the climber's Shindex to the gap, respect available knee flexion, and leave enough control to exit without swinging.
The move works especially well in roofs, overhangs, inside corners, overlaps, and tufas. It doesn't work when the contact sits on the kneecap, the foot is too far away, the surface is too sharp, or the climber loses tension while entering. Kneepads can improve comfort and friction, but they can also change precision and fit, so route-specific testing matters.
A reliable knee bar should allow a climber to pause and shake one arm at a time when the geometry is favorable. On long routes and humid walls, a dry-hand routine with liquid chalk beneath familiar powder chalk can support that rest by reducing the need to re-chalk mid-route. Start on forgiving terrain, learn the feel of opposition, and let the leg length determine the beta instead of forcing a position that the body and wall don't share.
Evermost LLC offers liquid chalk for climbers who want a clean, fast-drying grip layer without powder spreading through a gym or home space. Visit Evermost LLC to choose a grip option for climbing sessions where sweaty hands and venue chalk rules make reliable contact harder to maintain.