


Your Squat Rack Affordable Guide for 2026
You're probably standing in the same spot a lot of dedicated lifters hit when they stop relying on commercial gyms. There's open floor in the garage, basement, or spare room. There's a barbell on the shopping list. There's a budget that feels real. And there's one purchase that will decide whether the space becomes a serious training setup or a collection of compromises.
That purchase is the rack.
A good rack lets you train hard when nobody's around to hand off a bench or spot a missed squat. A bad one looks cheap on day one, then costs more through poor safeties, limited attachments, shaky reracks, and a setup you outgrow fast. If you're searching for a squat rack affordable enough to fit a real budget, that's the right instinct. The mistake is treating “affordable” like “lowest price.”
The Centerpiece of Your Home Gym
The first home gym decision usually feels like a money problem. It's really a training problem.
A rack dictates what lifts you can perform safely, how often you'll train, and whether your setup still works when your goals change. The athlete training for a stronger squat, the lifter trying to bench alone without drama, and the garage-gym owner who wants room for pulls, presses, and pull-ups all run into the same truth. The rack is the center of the room.
Initial thoughts often gravitate towards price tags. That's normal. In practice, the better question is simpler. What kind of training do you need this rack to support for years, not weeks?
A lifter with a barbell, plates, and a bench can get a lot done. But once you train alone, rack design stops being cosmetic. It becomes a safety decision. It also becomes a workflow decision. If the setup is awkward, hard to adjust, or too unstable to trust, training quality drops.
Practical rule: Buy the rack for the way you train when you're tired, lifting alone, and pushing close to your limit.
That's why the cheapest route often isn't the most affordable route. A rack that blocks future add-ons, forces ugly workarounds, or needs replacement once your training gets more serious doesn't save money. It delays spending.
If you're still mapping out the rest of your setup, this guide to home gym essentials is a useful companion. Build around the rack, not around impulse buys.
Squat Rack vs Power Rack vs Half Rack
The category matters before the brand does. If you choose the wrong style, even a well-built product won't feel right in your space.
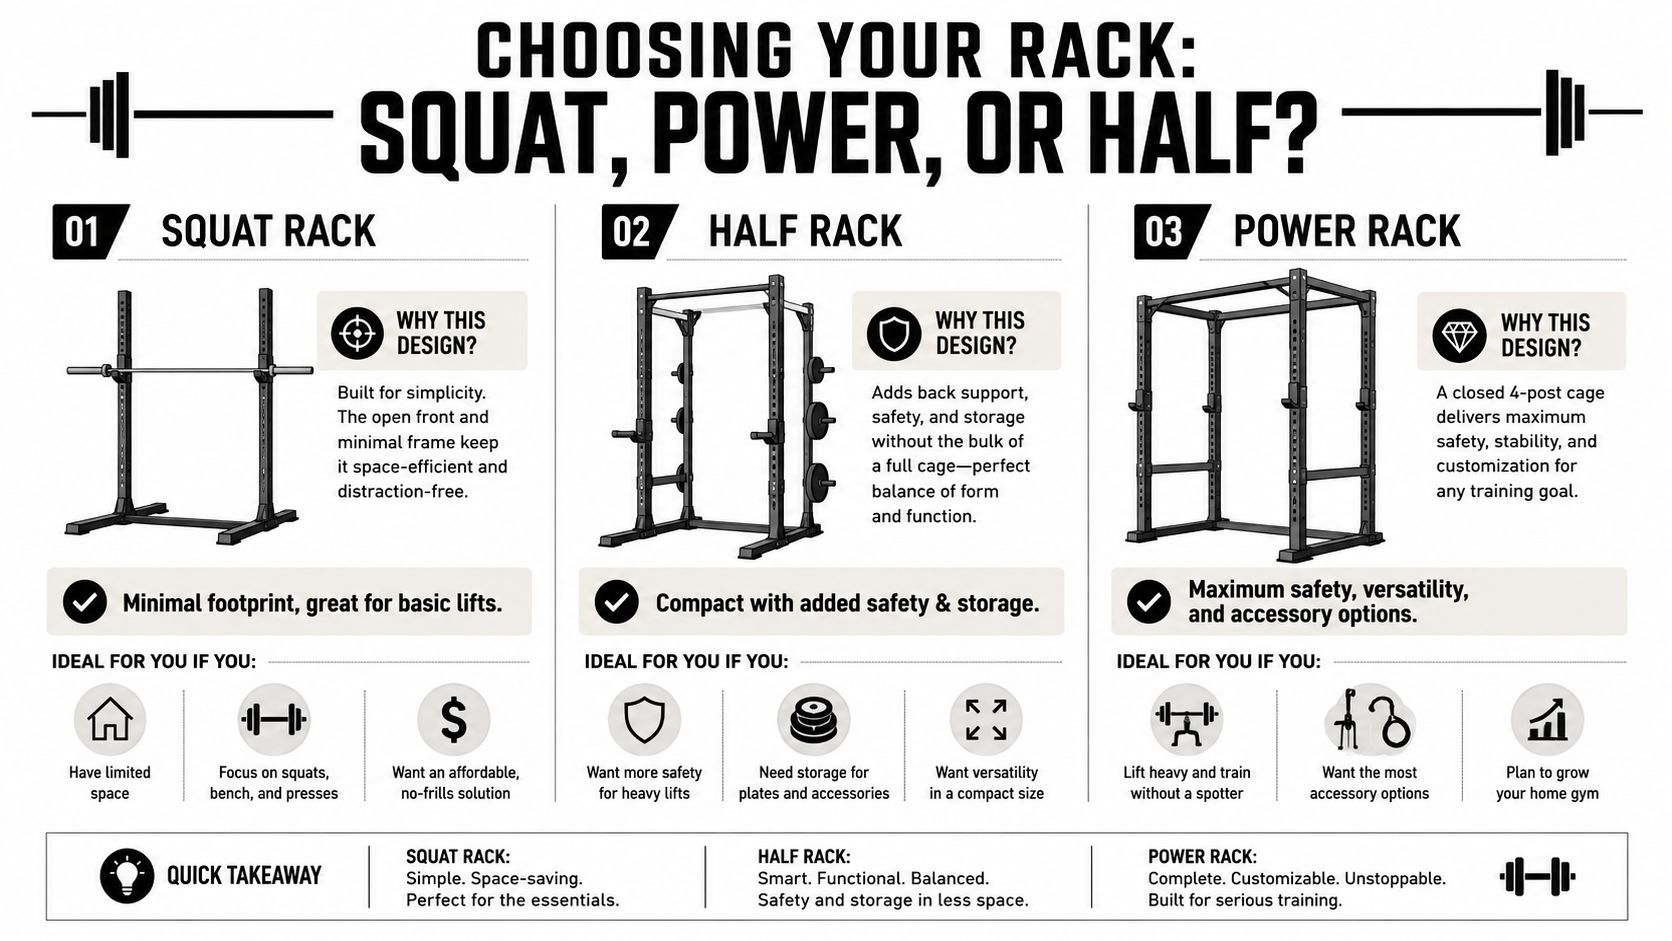
The minimalist choice
A basic squat rack or squat stand is the stripped-down option. It works well for lifters who care most about squats, overhead press, and maybe some barbell work where mobility and open space matter more than enclosure.
The upside is obvious. Smaller footprint, lower buy-in, easier fit in tight rooms.
The downside is also obvious once training gets serious. Safety depends more on setup, lift selection, and how disciplined you are with bar position and spotting strategy. If you miss badly, a minimal stand gives you less margin for error.
The balanced choice
A half rack sits in the middle. It gives you more structure, usually more built-in utility, and often more storage without taking over the room like a full cage can.
This is a strong choice for many garage lifters. It feels more open than a power rack, which some athletes prefer for front squats, standing press, and Olympic lift variations. It also tends to be shorter and cheaper than a power rack, which matters in low-ceiling spaces.
The safest solo-lifting choice
A power rack is the best answer for athletes who train alone and want the strongest safety case. Four posts create the cage. That gives you internal safeties and a more controlled environment for heavy squats, benching, pin work, and rack pulls.
If your training includes pushing hard without a partner, this is usually the easiest category to justify. You're paying for confidence and repeatability, not just more steel.
A quick visual can help if you're still deciding.
Rack Type Comparison
| Rack Type | Best For | Footprint | Safety | Price Range |
|---|---|---|---|---|
| Squat Rack | Minimalist barbell training, tight spaces | Smallest | Lowest of the three. Depends heavily on setup and user discipline | Lower end of the category |
| Half Rack | Home gyms balancing openness, storage, and function | Moderate | Better than a basic stand, but still more exposed than a full cage | Mid-range |
| Power Rack | Solo lifters, heavy barbell work, long-term expansion | Largest | Highest. Best option for internal safeties and enclosed lifting | Broad range, from budget to premium |
When people ask me what works best, I tie it to failure management. If you train alone and want to push bench and squat without hesitation, power racks win. If your room is cramped and your programming is straightforward, a half rack or basic squat rack affordable enough to leave money for a bench and bar can still be a smart build.
Decoding Steel Gauge and Uprights
Specs matter when they change how the rack behaves under load. Steel gauge and upright size do exactly that.
Why upright size changes the whole purchase
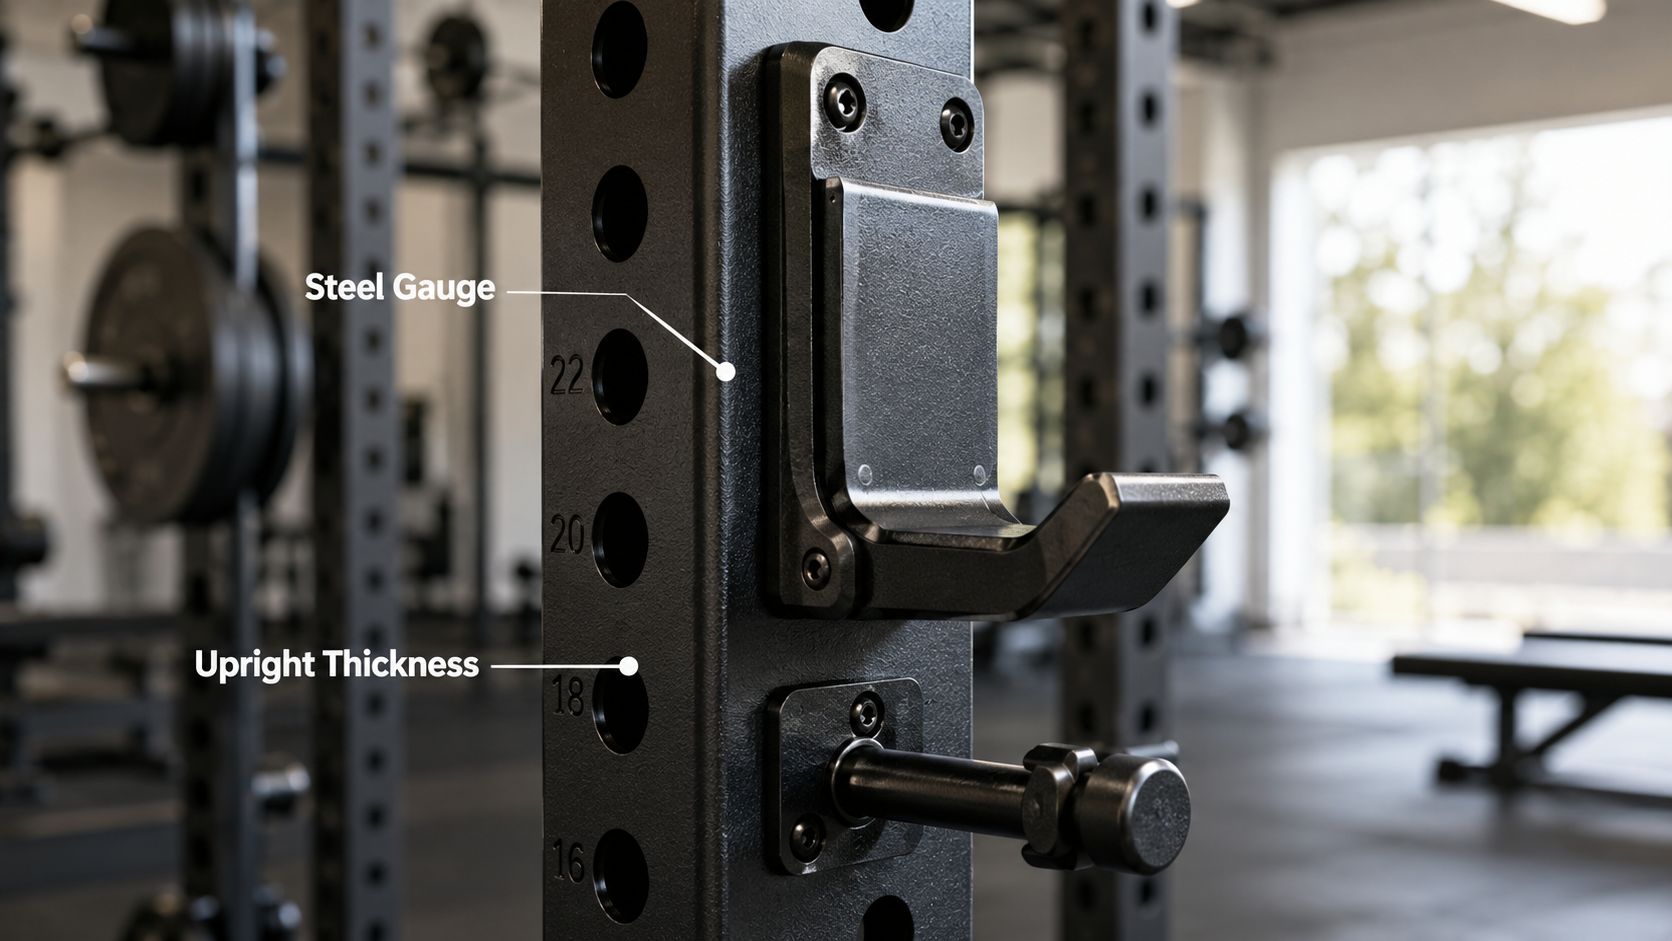
Expert reviews consistently note that 3" x 3" uprights with 11-gauge steel offer the broadest attachment compatibility and the strongest perceived durability, while 2" x 2" 12-gauge frames are common in lower-cost racks but reduce accessory ecosystem and load confidence, as discussed in this rack design analysis.
That sounds technical, but the practical meaning is straightforward.
A rack with larger, heavier uprights usually feels more planted when you re-rack a squat with some speed. J-cups tend to sit on a more sturdy structure. The rack usually has access to a better ecosystem of attachments. That last part matters more than most first-time buyers realize.
A cheaper frame can handle basic home use just fine. What it often can't do well is grow with you.
The hidden cost is attachment lock-in
If you buy into a narrower or more proprietary format, you may save upfront and lose options later. Cable add-ons, monolifts, lever arms, better safeties, and storage accessories often depend on upright size and hole pattern.
That's where a rack can become a dead end.
Buy steel once. Upgrade accessories later.
This is the same logic warehouse owners use when they think about structural systems before storage layout. If you want a simple analogy outside the gym world, this UK SME guide to pallet storage is useful because it shows how frame choices affect future use, access, and efficiency. Gym racks aren't warehouse racking, but the planning principle is similar. Structure first, accessories second.
What I'd prioritize
If value is the goal, use these filters:
- Prioritize upright standardization over fancy finish. Compatibility keeps a rack useful.
- Treat safeties and J-cups as part of the rack, not optional extras. They define how the system performs.
- Accept simpler features if the frame is solid. You can live without premium extras longer than you can live with a shaky rack.
A budget rack can be the right buy. A flimsy one with no growth path usually isn't.
Affordable Price Tiers What to Expect
The affordable market is broad now. That's good news, but it also creates confusion because a “budget” rack can mean very different things.
The real low end
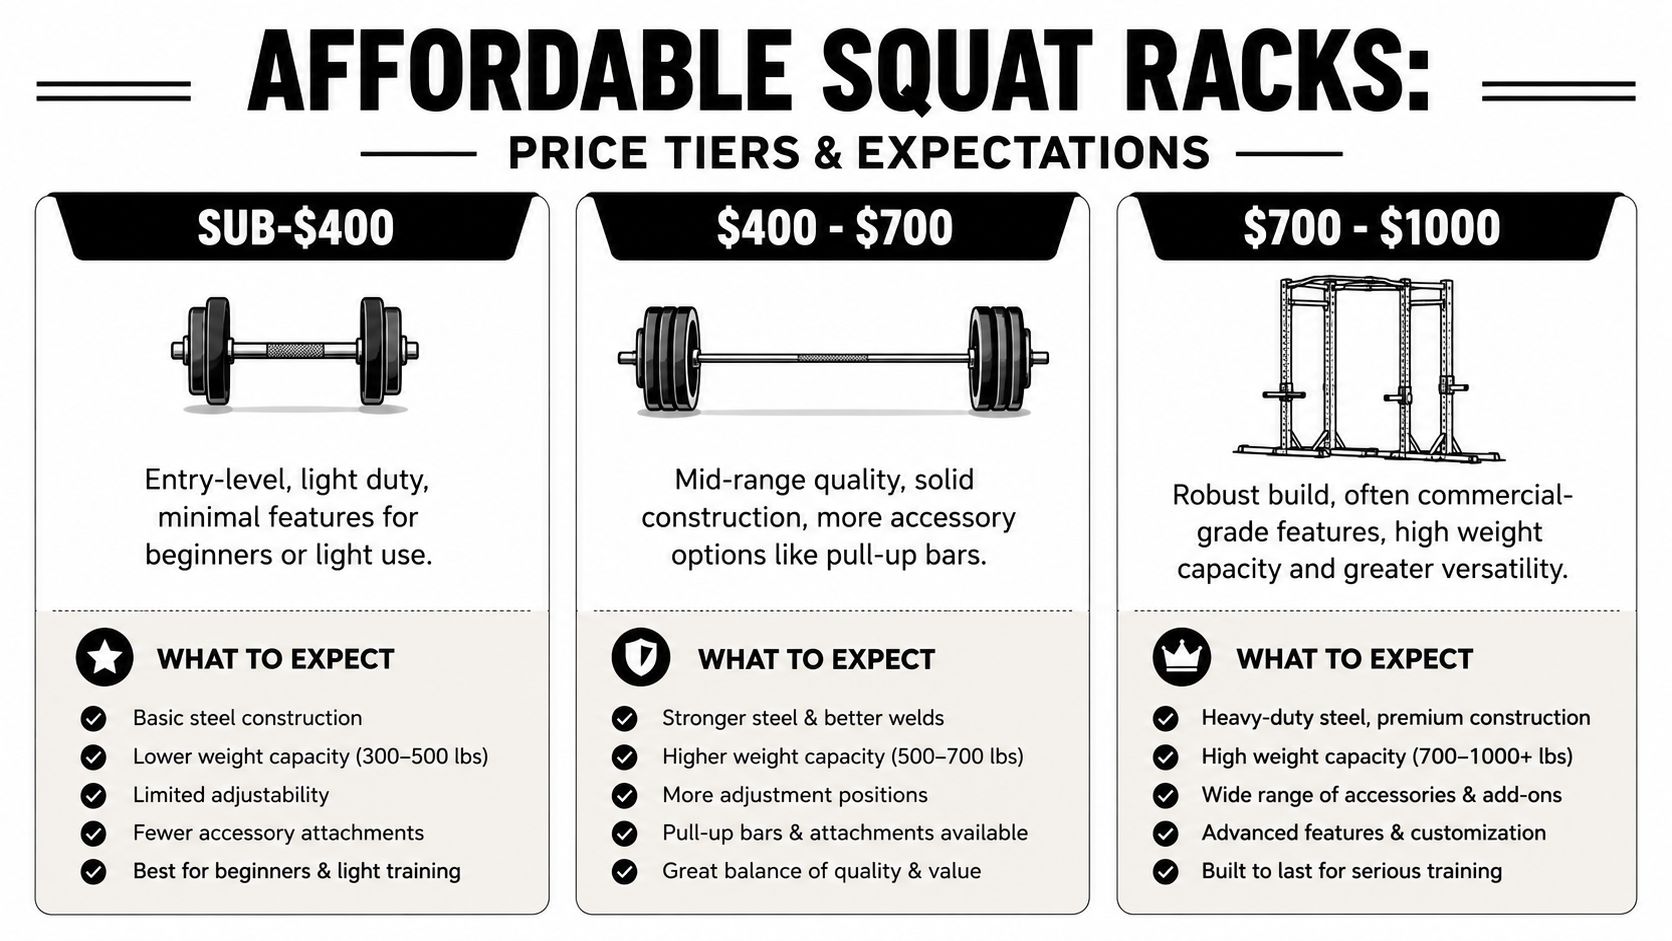
In the major home-gym market, a budget squat rack commonly starts around $300 to $500, while more feature-rich power racks often fall in the $600 to $1,500 range. Independent 2026 reviews also note that some solid options are available for under $400 and that a basic but functional squat rack can be found for less than $350, according to BarBend's squat rack roundup.
That gives you a realistic baseline. “Affordable” doesn't mean one thing. It means different compromises at different tiers.
What each tier usually buys
Under $400
This is the entry point for a true squat rack affordable enough for a lot of first-time home gym builds. Expect simpler designs, lighter-duty frames, and fewer included extras.
This tier can work very well for:
- Basic barbell training if your program is straightforward
- Smaller rooms where a minimal footprint matters
- Lifters who need function first and don't care about a broad accessory catalog yet
What doesn't work well here is expecting premium feel, broad compatibility, and future-proof expansion all at once.
Around $400 to the middle of the market
In this range, value often improves. You're more likely to find racks that feel less temporary and more like a long-term training base.
You may start to see:
- Better frame design
- More useful safeties
- Improved pull-up options
- A better path for add-ons later
For many serious home lifters, this is the sweet spot. Not because it's flashy, but because it reduces the odds that you'll replace the rack early.
Higher feature tiers
Once you move into the larger power rack category, the rack often becomes more than a barbell station. It turns into a platform for storage, cable work, and specialty attachments.
At this point, the smart question isn't “Can I afford more?” It's “Will I use more?”
A strong value buy isn't the cheapest rack. It's the least expensive rack you won't outgrow fast.
If your training is squat, bench, pull-up, and press, a modest setup can be enough. If you already know you want cables, storage, and expansion, buying too low can become expensive.
Where to Save and Where to Splurge
The best home gym buyers think like operators. They don't chase the lowest checkout total. They control total cost of ownership.
Most content focuses on sticker price while underplaying the cost of essentials like safeties, plate storage, attachments, flooring, and shipping. Independent review content also warns that very cheap options are often lower quality, and product pages show that add-ons materially change the final cost, as noted in Garage Gym Reviews' squat rack guide.
Spend where failure would matter
Put money into the parts that affect safety and daily use:
- The main frame should feel stable when you unrack and rerack.
- J-cups should protect the bar and sit securely.
- Safeties should match how you bench and squat.
- A bench and flooring deserve real consideration because they change setup quality every session.
If your rack budget gets squeezed, cut elsewhere first.
Save on what can wait
A lot of buyers overspend on accessories before they've earned the need for them.
Good places to hold back:
- Specialty attachments you might use occasionally
- Premium colors and cosmetic upgrades
- Extra storage pieces you can add later
- Complex configurations that look impressive but don't match your programming
The rack should solve training first. It doesn't need to impress visitors.
Think in seasons, not one purchase
A useful approach is to buy the structural core now and upgrade in phases. Start with rack, safeties, bench, bar, and flooring. Add storage once the room demands it. Add specialty attachments once your training makes them worth it.
That's how you keep a squat rack affordable without turning the whole build into a compromise. You spend on the pieces that are hard to replace and delay the ones that are easy to add.
Securing Your Lifts Accessories and Grip
A rack only does part of the job. The rest happens where your hands meet the bar and where your body meets the bench and floor.
A typical home-gym scene makes the point. You've loaded the bar for a hard bench triple. No spotter. Safeties are set correctly. The bench is centered. You lie down, squeeze the bar, and realize your hands are slick from heat and sweat. The rack can be perfect, but the rep still gets sketchy if your grip feels uncertain.
Accessories that earn their keep
A few add-ons change training quality right away:
- A stable bench makes pressing safer and more repeatable.
- Reliable collars keep loading secure.
- Flooring protects both the room and your footing.
- A grip aid helps when sweat turns simple lifts into avoidable risks.
Here's the grip side of that equation.

Liquid chalk makes sense in home gyms because it gives you a dry, tacky feel without the mess of loose chalk drifting across plates, floor mats, and upholstery. For lifters benching, squatting, pressing, rowing, or doing pull-ups inside a rack, cleaner grip matters. It improves confidence on the setup, especially when training alone.
In strength settings, that matters far beyond beginners. Collegiate weight rooms, powerlifting warm-up areas, and serious garage gyms all put a premium on repeatable bar control. Grip isn't just about hanging onto the bar. It affects how tightly you set the upper back, how hard you squeeze through the press, and how calm you stay before the unrack.
If your hands feel uncertain before the lift starts, the whole rep usually feels uncertain.
Don't ignore the setup around the setup
A lot of lifters buy the rack, then realize they still need the small things that make the rack work well. Wrist support is a good example for squat sessions, front rack positions, and heavy pressing. If that's part of your training, this article on wrist wraps for squats is worth reading.
The big idea is simple. The rack is the structure. Accessories are what let you use that structure with confidence.
Finding Value Beyond New Racks
Buying new isn't the only path. For disciplined shoppers, used racks can be the best value in the room.
The catch is that you need to inspect like a coach, not shop like a bargain hunter. Surface scratches are normal. Bent uprights, damaged holes, missing hardware, rust that goes beyond the finish, or sloppy welds are not.
What to inspect on a used rack
When you look at a secondhand rack, check these first:
- Uprights and crossmembers for bends, twists, or deformation
- Hardware and hole integrity so attachments still mount cleanly
- J-cups and safeties because worn contact points matter
- Base stability on the kind of floor you'll use
Cosmetic wear is cheap to live with. Structural uncertainty isn't.
The DIY temptation
DIY racks appeal to lifters who are handy, patient, and extremely confident in their fabrication skills. That route can save money, but only if the builder understands load paths, hardware quality, hole alignment, and safety under repeated use.
For most athletes, used commercial or consumer-grade racks are the better budget play. You get known geometry and tested design instead of guessing.
Storage matters too once the rack is in place. If you're planning plates, bars, collars, and small accessories around your footprint, this guide to a gym storage rack setup can help keep the room usable instead of cluttered.
A used rack is a smart move when the frame is sound and the price reflects condition. A bad used rack is just a delayed replacement.
FAQ About Affordable Squat Racks
Do I need to bolt my rack down
It depends on the design, your flooring, and how you train. Some racks feel stable enough as built, while others benefit from anchoring, plate storage, or a platform. If you use pull-ups aggressively, add attachments, or rerack hard, stability matters more. Follow the manufacturer's instructions first, then assess how the rack behaves under your normal training.
How much ceiling height do I need
Existing coverage acknowledges that half racks are shorter and cheaper than power racks, and that many budget racks come in 80- to 90-inch heights, but it rarely answers the practical fit question for basements and garages, as noted in this low-ceiling rack discussion. In practice, you need clearance not just for the rack but for pull-ups, overhead work, and getting hardware into place during assembly.
Is a cheap rack safe enough
Sometimes yes, sometimes no. The right question is whether the rack is safe enough for your training. Light, controlled lifting with proper safeties is different from heavy solo benching, dynamic pull-ups, or a long-term plan for attachments. Cheap can be smart. Cheap can also mean narrow upgrade options and weaker confidence every time you rerack.
Should I choose a half rack or power rack for a small home gym
If you train alone and prioritize heavy squat and bench safety, a power rack usually wins if the room allows it. If space is tighter and you want a more open feel, a half rack can be the better compromise. Measure the room, the ceiling, and the usable space around the rack, not just the rack footprint on paper.
Evermost LLC makes EVMT Liquid Chalk for athletes who want a cleaner, gym-friendly grip solution for lifting, climbing, gymnastics, and grip-heavy training. If your home gym setup is coming together and you want bar control without loose chalk mess, EVMT is worth a look.