


How to Racewalk: A Practical Technique Guide
The most common advice about racewalking is also the most incomplete: keep one foot down, straighten the knee, and walk faster. That description sounds simple until a beginner reaches race pace, fatigue shortens control, and a movement that looked legal in a slow drill becomes visible lifting or a bent-knee violation. Learning how to racewalk means building mechanics that remain compliant when cadence rises, not copying an exaggerated pose for a few careful steps.
Racewalking rewards patience. Speed comes from quick turnover, forward pelvic movement, and efficient hip rotation, while the athlete manages rules that judges assess with the human eye. The practical target isn't the longest stride or the most dramatic hip action. It's smooth forward movement that stays legal when the body is under pressure.
Table of Contents
- Why Racewalking Is Not Just Fast Walking
- Building the Core Racewalking Position
- Drills That Build Legal Cadence and Hip Action
- Understanding the Rules and How Judges Apply Them
- A First-Week Training Plan You Can Actually Follow
- Common Faults and What They Actually Mean
- Putting It All Together for Your First Race
Why Racewalking Is Not Just Fast Walking
Racewalking isn't ordinary walking performed at a higher speed. World Athletics defines the event around two technical requirements: the athlete must maintain visible ground contact, and the advancing leg must straighten from first contact until the body passes over it. A brief airborne phase is called lifting, and a judge can penalize it even when it lasts too briefly for the athlete to feel it. World Athletics describes the central racewalking rules.
Those rules create the sport's central tension. A beginner may look perfectly controlled while practicing slowly, then lose contact or soften the knee when trying to hold a faster pace. The athlete's internal sensation isn't the deciding test. Visible legality at racing speed is.
Coaching rule: If the technique only works when the pace is comfortable, it isn't ready for competition.
Where speed actually comes from
Running-style reach is usually the wrong answer. Racewalkers create speed through rapid step turnover, forward pelvic movement, hip extension, and coordinated rotation. The stride should be compact enough to preserve cadence, with the heel landing under or only modestly ahead of the center of mass.
Elite-performance data support that balance. Faster racewalkers commonly combine a step length of approximately 70% of body height with cadence near 200 steps per minute, while research on elite men found speed correlated with both step length, r = .54, and cadence, r = .58. The World Athletics racewalking guidance provides these biomechanical findings.
The lesson isn't to force a particular number immediately. It's to stop treating a longer stride as automatic progress. Reaching farther can add braking, lower cadence, and make contact harder to control. Beginners should first make the steps quicker and quieter, then allow useful length to appear without lunging.
Building the Core Racewalking Position
Racewalking starts with the position above the feet. The torso should be tall without being rigid, the pelvis stable enough to support the legs, and the shoulders relaxed so the hips can move without the upper body fighting them. The head stays aligned over the trunk, with the eyes forward rather than angled down at the feet.
Rehearse contact before adding speed
Stand in place and shift weight onto one leg. Bring the other heel forward until it would land under or slightly ahead of the center of mass. Let the foot roll from heel toward the forefoot, then allow the body to pass over it while the opposite hip moves forward.
The lead leg needs to be straightened at contact, but straightened doesn't mean jammed backward. A rigid, hyperextended knee can increase braking and discomfort. The legal cue is a controlled straightening that remains visible until the body passes over the leg, not an artificial pose that locks the joint.
A useful rehearsal sequence is:
- Stack the body. Keep the pelvis level, ribs settled, shoulders loose, and head balanced.
- Place the heel carefully. Avoid reaching far ahead. The foot should meet the ground close to the body's moving line.
- Show the straight leg. Straighten the advancing knee naturally at first contact, then maintain that line through the stance.
- Roll and replace. Move the body over the foot and bring the other leg through with a quick, controlled step.
The same principle applies to athletes who are improving movement elsewhere. A plain-language resource on OMT explained for patients can help readers understand how practitioners discuss whole-body movement and function, but racewalking practice still needs event-specific observation.
Keep the upper body quiet
The arms balance the action; they shouldn't become the engine. Excessive arm swing often appears when the athlete tries to manufacture speed after the hips stop contributing. The hands can stay relaxed, elbows bent comfortably, and shoulders level.
Beginners can rehearse this posture during simple floor-based movement and trunk-control work, including the sit-up variations resource, provided those exercises don't replace racewalking-specific practice. If sweaty hands make balance drills or support work distracting, EVMT LIQUID CHALK is a magnesium-carbonate liquid chalk option used across weightlifting, gymnastics, rock climbing, and sports. It dries in seconds, makes no dust, and leaves no residue on bars or poles once dry.
Drills That Build Legal Cadence and Hip Action
The fastest route to better racewalking isn't a dramatic stride. It's the ability to repeat a legal step while the cadence rises. Drills should make the athlete notice the first sign of breakdown, then stop before that error becomes the new pattern.
Start with a cadence ladder
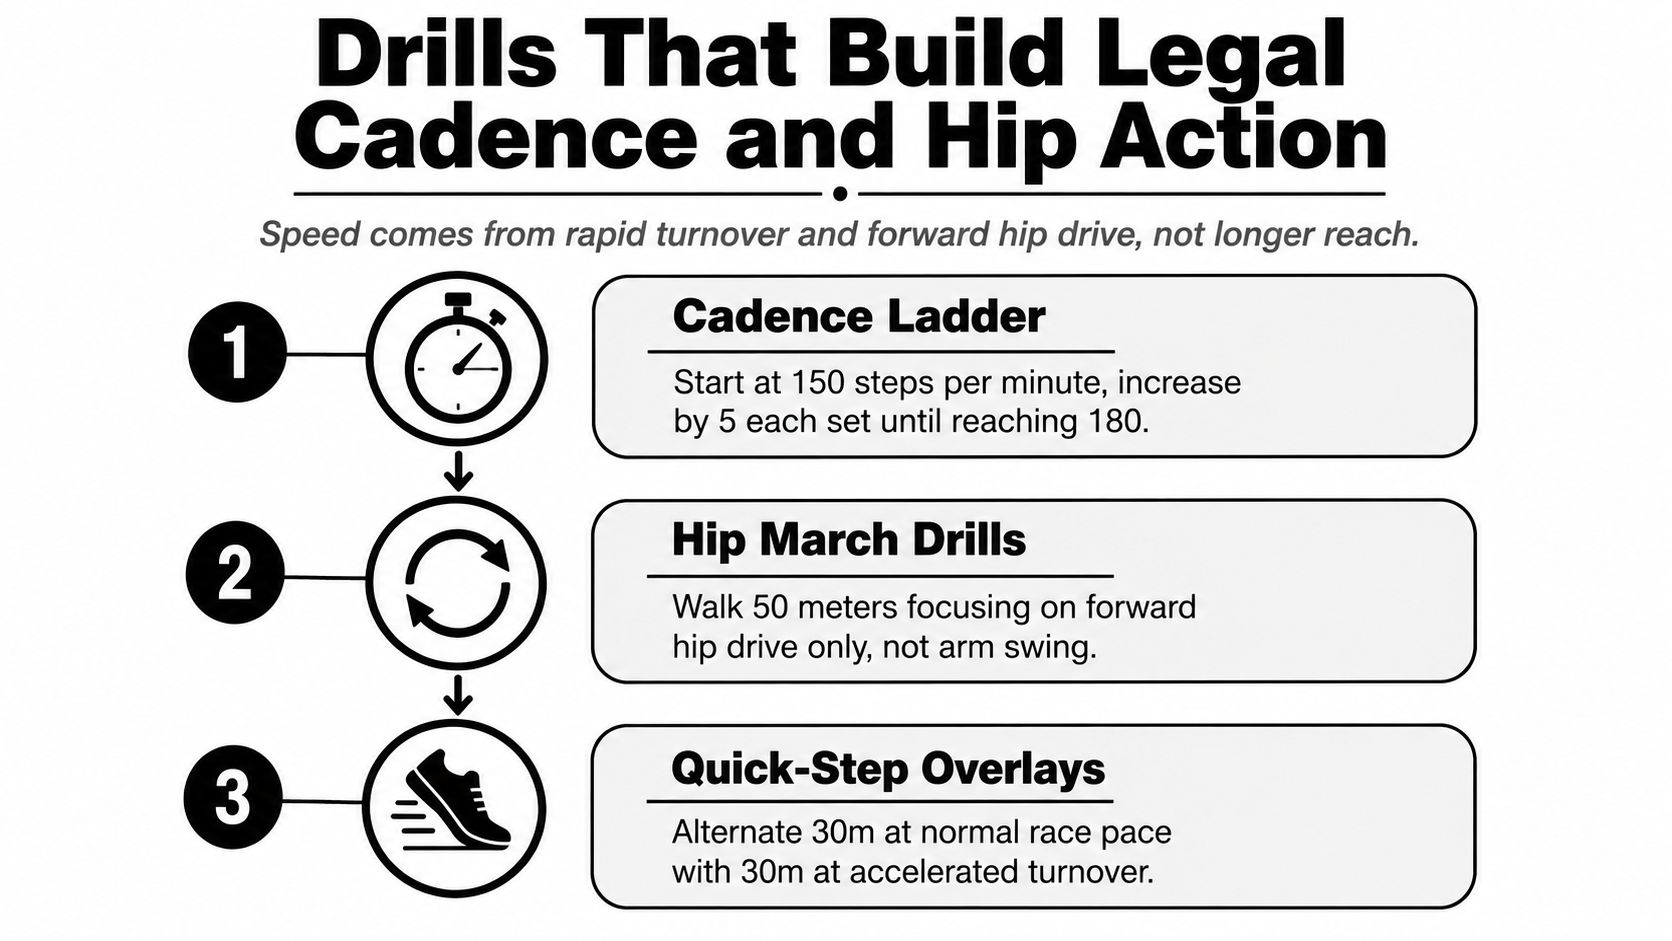
Use a metronome or an audible step count and begin below maximum effort. The aim is a quicker exchange of steps without reaching farther. If the lead knee softens, the foot begins to land far ahead, or the torso starts bouncing, the cadence is too high for the current mechanics.
A practical technical set is 6 to 10 repetitions of 1 minute at controlled speed, with easy walking between repetitions. Stop the repetition when form deteriorates, not after the athlete has spent another minute rehearsing a violation.
Add hip action without forcing rotation
Stand tall and practice moving one hip forward as the opposite leg prepares to land. The motion should come from the pelvis, not from twisting the shoulders or throwing the leg outward. Then use a slow march, keeping the steps short and the trunk quiet.
Athletes who lack comfortable hip movement can review hip mobility drills that work for general mobility ideas. Those drills may support range and control, but they don't substitute for checking whether the knee is straight at contact or whether contact remains visibly continuous.
A second useful practice is a straight-leg quick-step overlay. Walk with minimal forward travel, emphasizing a clean heel contact, controlled straightening, and rapid replacement. The athlete should feel the feet moving quickly beneath the body rather than projecting the body over a long stride.
Combine the pieces gradually
After the drills, walk a short stretch at controlled race pace. Film from the side if possible and check four markers:
- Contact: no visible airborne phase.
- Knee: the advancing leg is straightened at contact and through the required stance.
- Trunk: no pronounced lateral swing or forward collapse.
- Foot placement: no aggressive reach that creates braking.
A balanced base also matters in any athletic setting. General guidance on equipment for balance can help athletes think about stability, but the racewalking surface should remain flat and predictable while technique is being learned.
Understanding the Rules and How Judges Apply Them
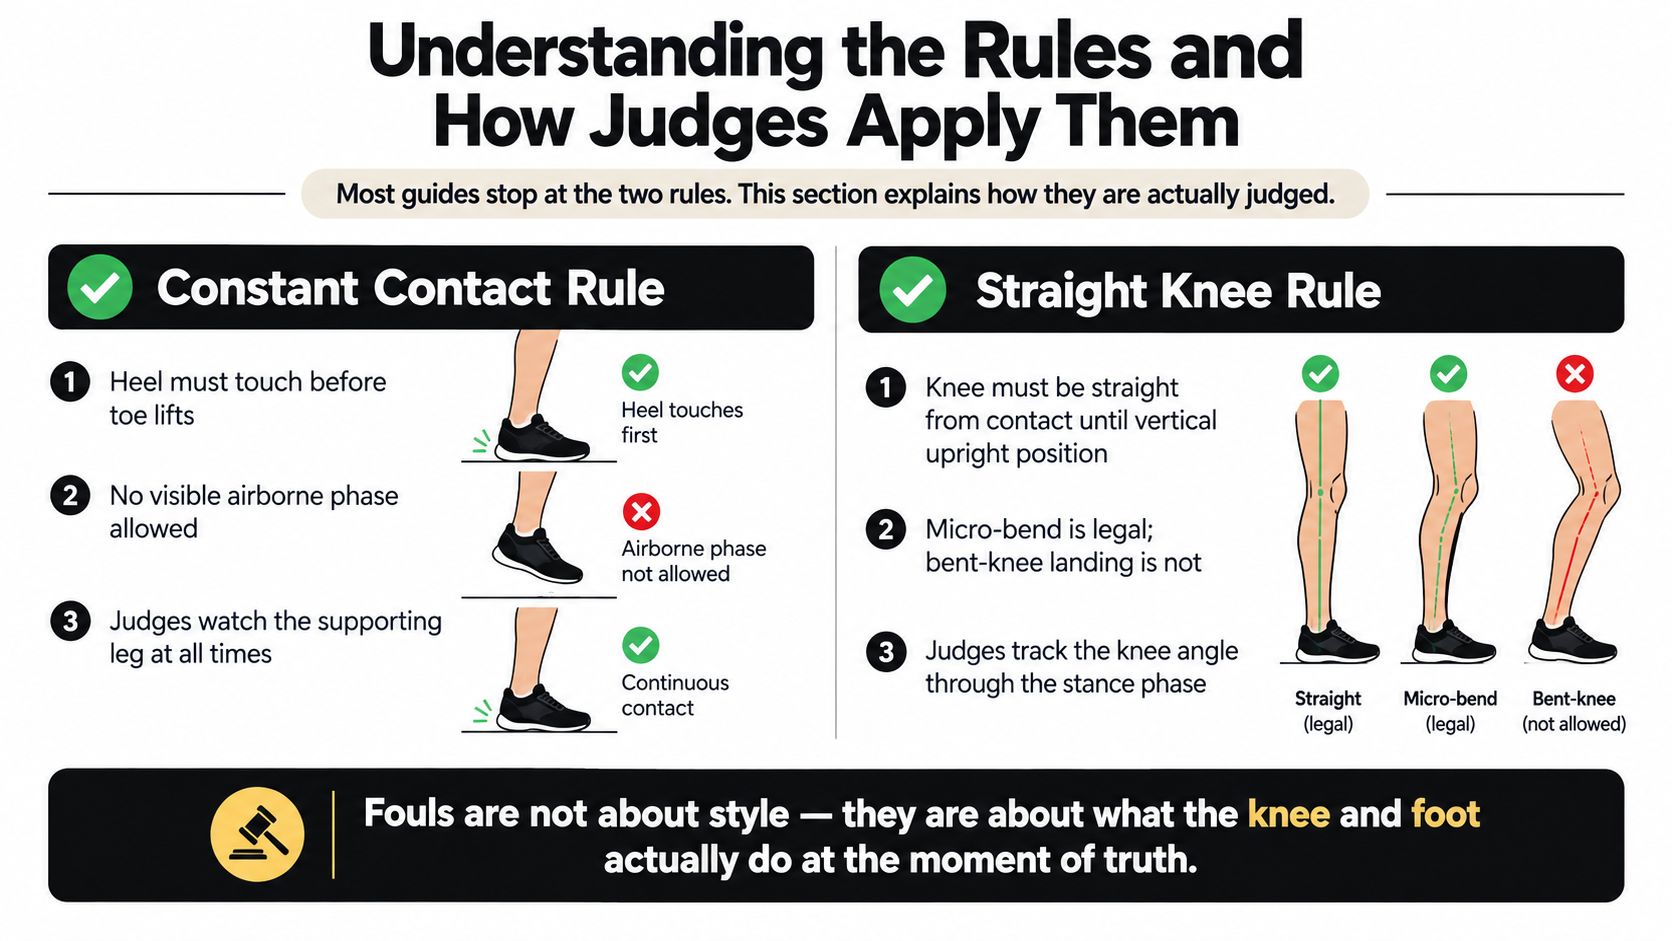
The two rules are easy to recite and harder to satisfy under pressure. Judges don't award legality because an athlete intended to keep contact or because slow-motion footage later reveals a technically acceptable instant. They assess what the human eye can detect during the event.
The first risk is lifting, a visible loss of contact. The second is a bent-knee violation, where the advancing leg isn't straightened from initial contact until the body passes over it. A knee needn't be forced into an exaggerated lock. The question is whether the leg is visibly straightened at the required point and remains so through the stance.
Why a warning can become a race-ending problem
A judge may issue a warning for visible loss of contact or failure to straighten the advancing leg. Under World Athletics racewalking guidance, three red cards from different judges can trigger disqualification, while current event procedures can use a penalty zone before a fourth red card produces disqualification. World Athletics racewalking material explains the judging and penalty framework.
The practical implication is severe but useful: a technique that looks almost legal isn't safe enough if it repeatedly produces borderline moments. Beginners should train the visual evidence, not just the physical feeling.
Use a simple side-view audit
A smartphone and stable support are enough for an initial check. Film at normal speed from the side, then watch the same sequence in slow motion to investigate anything questionable.
- Check whether the foot remains visibly connected through each step.
- Follow the landing leg from heel contact through the vertical position.
- Look for a knee that arrives flexed or collapses soon after contact.
- Watch for a bounce, excessive forward lean, or sideways trunk rotation.
- Repeat the test at the pace used in training, not only during slow drills.
The normal-speed view matters most because judging is visual. Slow motion helps identify why a moment failed, but it shouldn't create false confidence that a judge would have ignored an airborne phase.
A First-Week Training Plan You Can Actually Follow
A first week should teach repeatable mechanics, not test endurance. A beginner who can walk comfortably but has no racewalking background can use short flat-ground sessions, leaving enough recovery to notice whether the hips, shins, knees, heels, or feet are adapting normally.
A sample week might look like this:
- Day one: 20-minute technique walk, alternating easy walking with brief legal-form intervals.
- Day two: Easy 30 to 40-minute walk on flat ground.
- Day three: Mobility work and a short side-view video review.
- Day four: Rest or gentle recovery walking.
- Day five: Easy 30 to 40-minute aerobic walk, keeping the pace below the point where form changes.
- Day six: Short technique session using the cadence drills, without adding a hard speed effort.
- Day seven: Rest, or an easy walk if the gait remains comfortable.
The key progression rule is simple: increase duration or speed, not both at once. If a faster pace causes lifting, a flexed knee, or a large stride, the athlete should reduce speed and preserve the mechanics already learned.
Choosing the right starting point
| Your Background | Sessions This Week | Focus | What to Skip |
|---|---|---|---|
| New to structured walking | Three short sessions | Posture, contact, and straightened knee | Long continuous racewalking |
| Comfortable recreational walker | Four sessions | Brief technique intervals on flat ground | Fast finishes and steep hills |
| Experienced runner | Three to four sessions | Coordination and legal cadence | Assuming running fitness transfers automatically |
| Returning after pain or injury | Two to three easy sessions | Symptom-free mechanics and recovery | Speed work and rapid volume increases |
Recovery isn't wasted time. Athletes managing a previous issue can use general guidance on active recovery after sports injury as background, while seeking appropriate clinical advice for persistent or worsening symptoms. Racewalking should be replaced with easy walking when pain changes the gait.
A home-gym athlete may already understand gradual loading from resources such as sleds for weight training, but racewalking has its own coordination demands. Strength doesn't guarantee legal contact or a straightened knee at speed.
Common Faults and What They Actually Mean
Racewalking faults usually reveal a coordination problem rather than a lack of determination. The athlete tries to move faster, adds force, and accidentally removes the exact control the rules require.
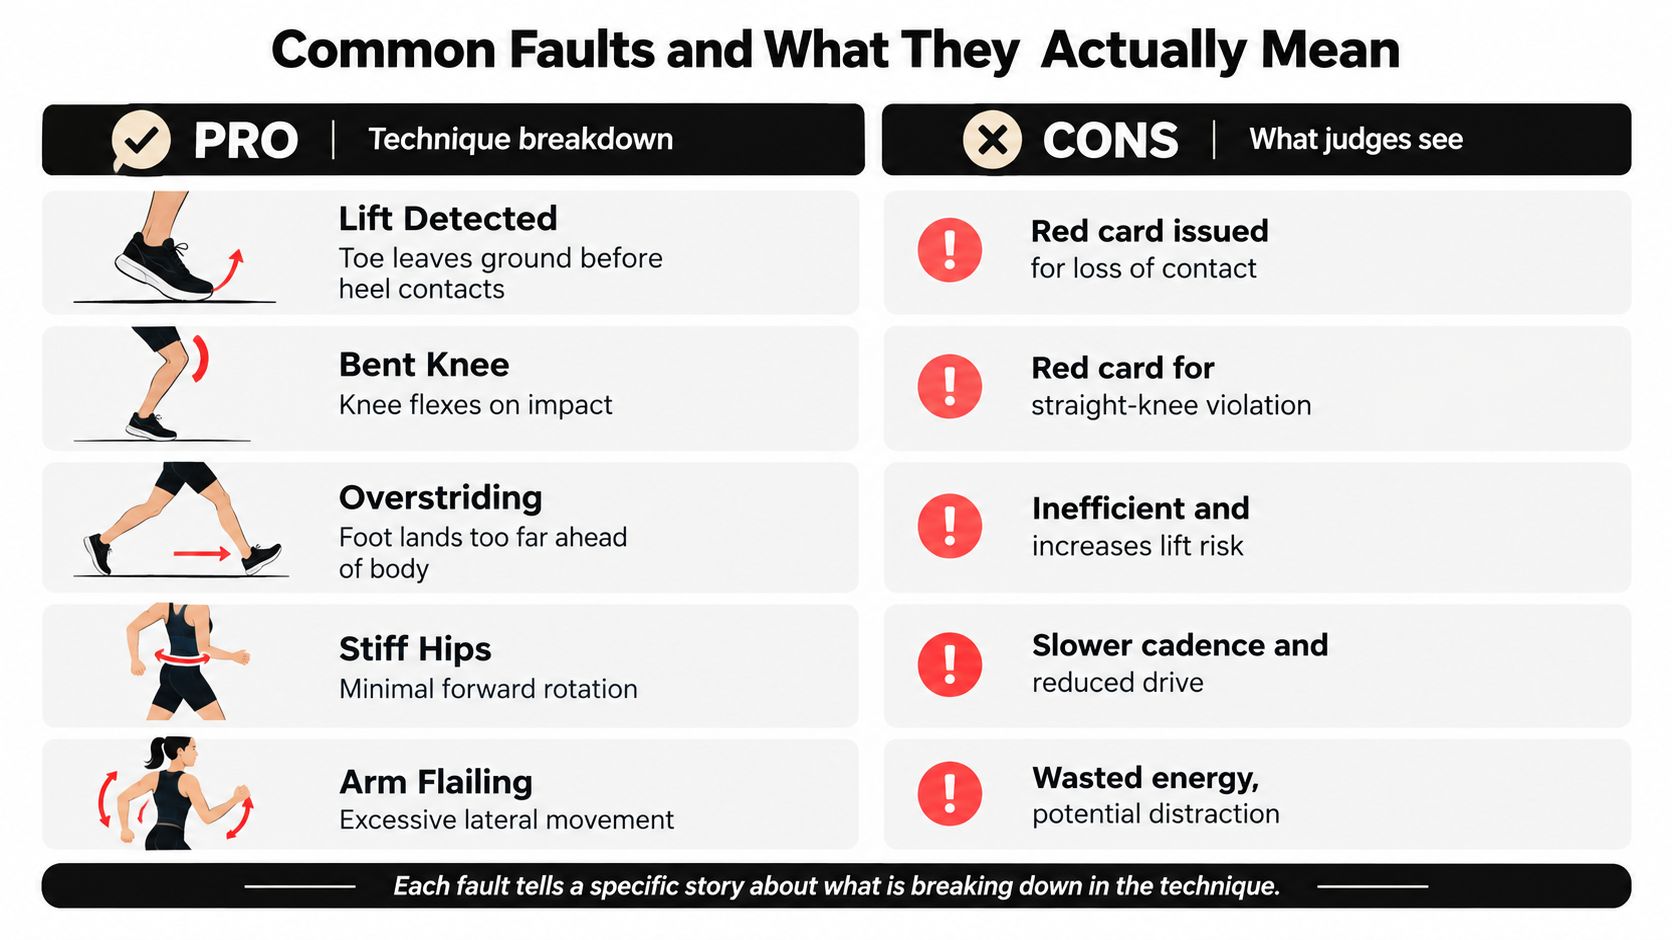
Lifting often appears when the athlete adds vertical propulsion or lets cadence drift. Research on 19 world-class racewalkers, using force-plate data at 1,000 Hz and high-speed video at 100 Hz, found that faster performance correlated with flight time, r = .46, p = .049, and flight distance, r = .69, p = .001, even though visible flight is prohibited. The biomechanical study is available through PubMed. The finding explains why speed work must be visually checked. Tiny airborne intervals can emerge as pace rises.
Overstriding is another trap. Greater foot placement ahead of the body was associated with longer steps, r = .45, but lower cadence, r = −.62, in the cited elite biomechanical research. A long reach may look athletic, yet it can increase braking and make contact harder to control. Faster walkers should narrow the step and increase turnover instead.
Lateral trunk rotation usually means the arms or shoulders are compensating for missing hip action. Forced hip pivoting creates a similar problem. The pelvis should move forward efficiently, not swing dramatically from side to side.
Racewalking isn't automatically low impact
Continuous contact removes the running flight phase, but the straight-leg landing and distinctive foot mechanics can shift stress toward the heel, ankle, knee, and hip. Biomechanical reviews identify features such as high heel pressure, ankle eversion, plantarflexion, hip adduction, and changing foot and ankle pressure as relevant loading considerations. The review of racewalking biomechanics and injury considerations provides the broader context.
An injury review reported that about two-thirds of 682 surveyed racewalkers had sustained at least one career injury. World Athletics racewalking guidance cites this injury finding.
Normal adaptation can include general muscular fatigue. Persistent focal pain, pain that worsens each session, or discomfort that forces a change in gait indicates a technique or loading problem. The response is to reduce volume, return to easy walking, review the side-view footage, and seek clinical assessment when symptoms don't settle.
Putting It All Together for Your First Race
A first race rewards restraint early. Warm up with easy walking and a few controlled technique repetitions, then keep the opening 200 meters below the pace that makes the athlete reach or bounce. Through the middle, monitor contact, knee position, relaxed shoulders, quiet trunk, and quick steps.
The final kilometer is where rehearsed mechanics matter most. If cadence fades, shorten the stride rather than reaching. If the knee softens, reduce pace before the violation becomes visible.
A printable self-audit can stay simple:
- Contact: Is any airborne phase visibly detectable?
- Knee: Does the advancing leg straighten at contact?
- Posture: Is the pelvis stable and the trunk tall?
- Arms: Are they balanced rather than flailing?
- Cadence: Are the steps quick enough to avoid overstriding?
After the event, review normal-speed video first, then slow motion. A local racewalking club, qualified coach, or sanctioned event can provide the judging context that solo practice can't fully reproduce.
Evermost LLC offers EVMT Liquid Chalk, a fast-drying, dust-free grip aid for athletes who train with sweaty hands and need cleaner handling in gyms or competition settings. Racewalkers who also lift, climb, or practice grip-intensive sports can visit Evermost LLC to explore the product and its use across training environments.